Creating a Java GUI using Swing in IntelliJ IDEA
So far our our programming has been limited to a command line interface, however for many people, this does not provide the best user experience, and a Graphical User Interface (GUI) provides an enhanced user experience. Fortunately, Java provide a set of components 'Swing components' which allow for the creation of a User Interface, what's more is that they work across different platforms (e.g. Mac / Windows).
This tutorial takes you through the process of creating a 'Hello World' application using a GUI.
Creating the project
- Start by creating a new Java Project in IntelliJ, however rather than using a command line template, simply create it without a template.
- Right click on the src folder in the project window and choose New -> Swing UI Designer -> GUI Form
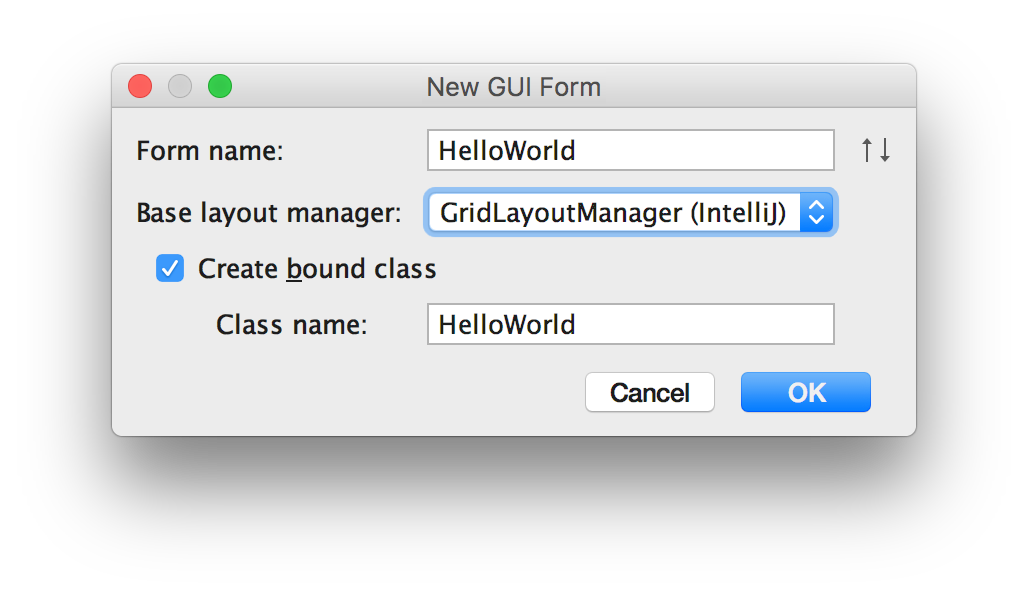
- Name the form 'HelloWorld', and configure it as shown in the screenshot below
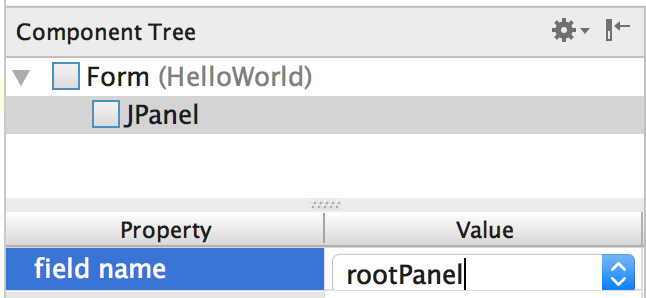
- The form will be displayed, and will include, by default, a panel. In the component tree (likely left of centre of the IDE) select the JPanel and beneath it, enter the value 'rootPanel' into the field name property box, as shown here:
- Browse to the HelloWorld.java file and ensure that you can now see the jPanel as a variable in the HelloWorld class as follows:
public class HelloWorld { private JPanel rootPanel; } - The next stage is to ensure that the application runs the form on startup, so, with the cursor inside the HelloWorld class code, in the menu, click Code, then 'Generate...' and in the box that appears, choose 'Form main()'. This will add the following code to the file:
public static void main(String[] args) { JFrame frame = new JFrame("HelloWorld"); frame.setContentPane(new HelloWorld().rootPanel); frame.setDefaultCloseOperation(JFrame.EXIT_ON_CLOSE); frame.pack(); frame.setVisible(true); } - If IntelliJ displays a warning on the
JFrame.EXIT_ON_CLOSEcode, you can replace it withWindowConstants.EXIT_ON_CLOSEinstead - To run the code, we must create a configuration which will execute the
mainmethod inside the HelloWorld class. To do this click 'Run' on the menu, followed by 'Run...' - In the dialogue that appears, choose the 'HelloWorld' option
- The application will run, but as the JPanel has no content, you will likely only see what looks like the title bar of an applicaton, with no contents below it (and you may have to look carefully for it!):
- Close the programme
- Return to the form and drag a JLabel onto it at the top of the Window
- Select the label in the Component tree (as you did with the JPanel) and set it to have a field name of helloLabel
- Add a JButton below the label and set its field name to helloButton
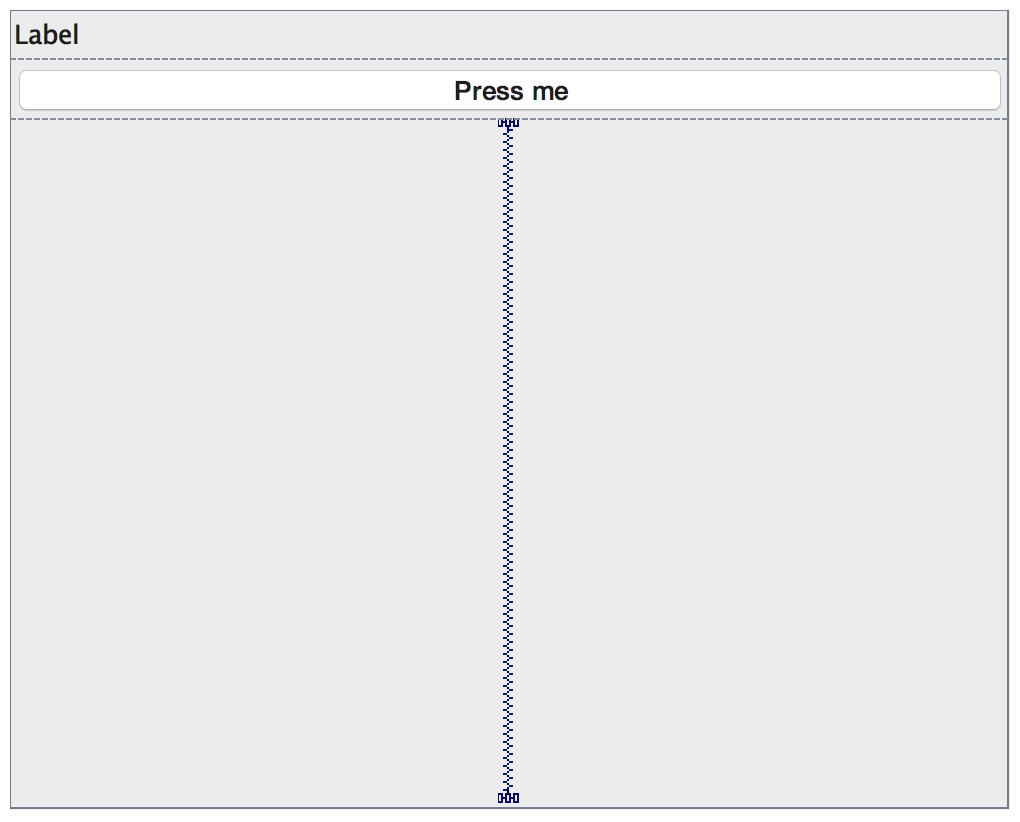
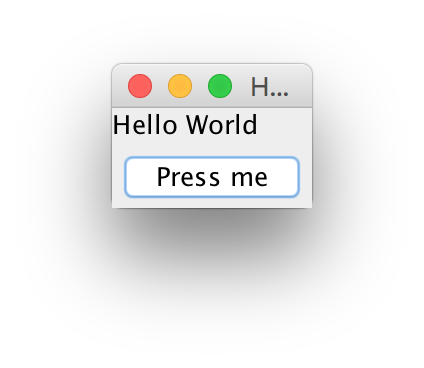
- Click in the button and set it's text to 'Press me'. It should now look something like this:
- Right-click on the button and choose 'Create Listener' from the menu, then from the dialogue box that appears, choose 'ActionListener'. This creates a method in the code which will be called when a user clicks on the button.
- Click OK on the next dialogue that appears and you will be taken back to the HelloWorld.java file, but the following constructor code will now have been added:
public HelloWorld() { helloButton.addActionListener(new ActionListener() { @Override public void actionPerformed(ActionEvent e) { } }); } - This code adds a 'listener' to the button, such that when it is pressed it calls the inner
actionPerformed()method. Add the following code inside the actionPerformed method, so that when it is invoked the label displays the message "Hello World":public HelloWorld() { helloButton.addActionListener(new ActionListener() { @Override public void actionPerformed(ActionEvent e) { helloLabel.setText("Hello World"); } }); } - Run the project and you now see a label (with the text 'label') and a button. Press the button and the label's text should change to "Hello World"
Further development
In a similar way to our initial Hello World command line application, it would be good to improve our application, so that can request the user's name and greet them personally.
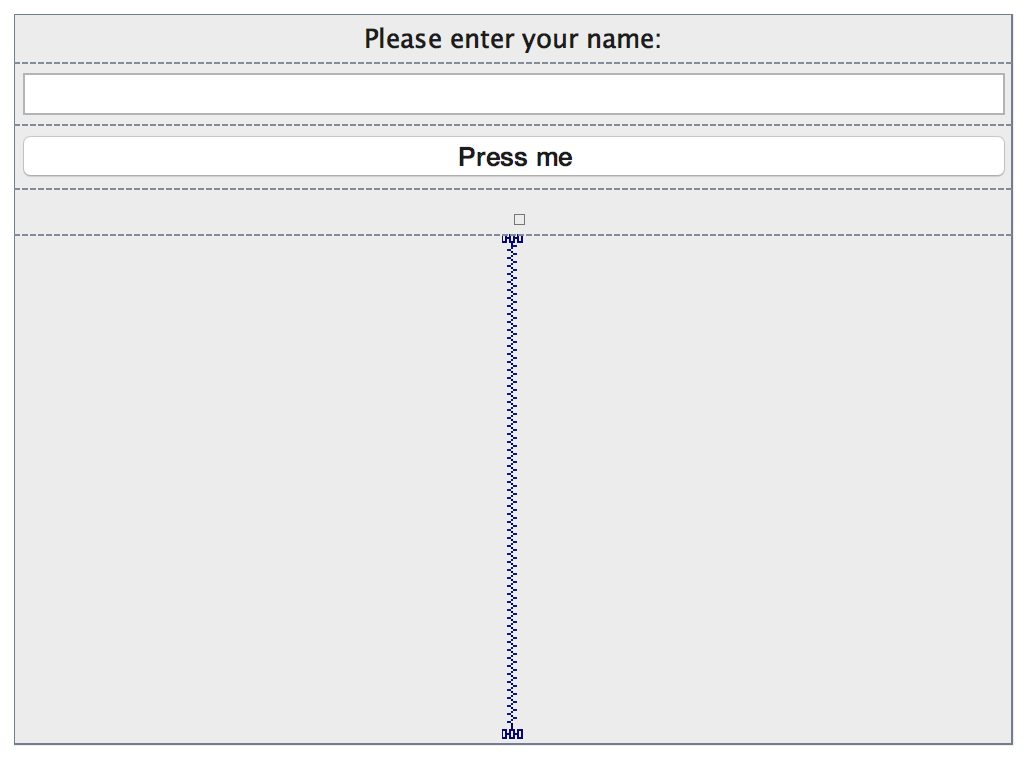
- Add a JLabel to the top of the form and set its text to "Please enter your name"
- Use the Horizontal Align property to set its position to centred
- Beneath the label you just added, add a JTextField, and set its field name to nameTextField
- Rearrange the existing button and label, so the helloLabel is below the button
- Remove the existing text from the nameLabel so it is empty.
- In the properties for the helloLabel, expand the Minimum Size property and set the minimum height to 25. This will ensure space appears for it even before it has any text inside.
- Save the form. It should now appears as follows:
- Return to the HelloWorld.java file
- Modify the code inside the helloButton's ActionListener's
actionPerformed()method to read the value from the textbox as follows:String greeting = "Hello " + nameTextField.getText(); helloLabel.setText(greeting); - Run the application, type your name into the text field and verify that you get a personalised greeting