Notifications and Started Services
On of the ways to drive engagement with a mobile application is through the use of notifications. This tutorial will go through the basics of creating an app which can initially create notifications which appear instantly, then using a started service, delay those notifications by a specified period of time
- Create a new Android Application named Reminders, targeting API 21 and later, and using an Empty Activity as the starting point
- Keep the default name for the Activity
- Add the following to the AndroidManifst XML file
<uses-permission android:name="android.permission.POST_NOTIFICATIONS" /> - Configure a View Binding named
bindingfor MainActivity in the usual way -
Because one of the primary focuses of the application will be sending notifications, add the following method to MainActivity which will check for, and request permissions to, send notifications
fun setupPermissions(){ val requestPermissionLauncher = registerForActivityResult(ActivityResultContracts.RequestPermission()){ permitted: Boolean -> if (!permitted){ Toast.makeText(this,"Permission not granted, this app will not function", Toast.LENGTH_LONG).show() } } if (ContextCompat.checkSelfPermission(this,android.Manifest.permission.POST_NOTIFICATIONS) != PackageManager.PERMISSION_GRANTED){ if (Build.VERSION.SDK_INT >= Build.VERSION_CODES.TIRAMISU) { requestPermissionLauncher.launch(android.Manifest.permission.POST_NOTIFICATIONS) } } } - Add a call to this method to the end of the
onCreatemethod -
Configure the UI for the application to appear as follows:
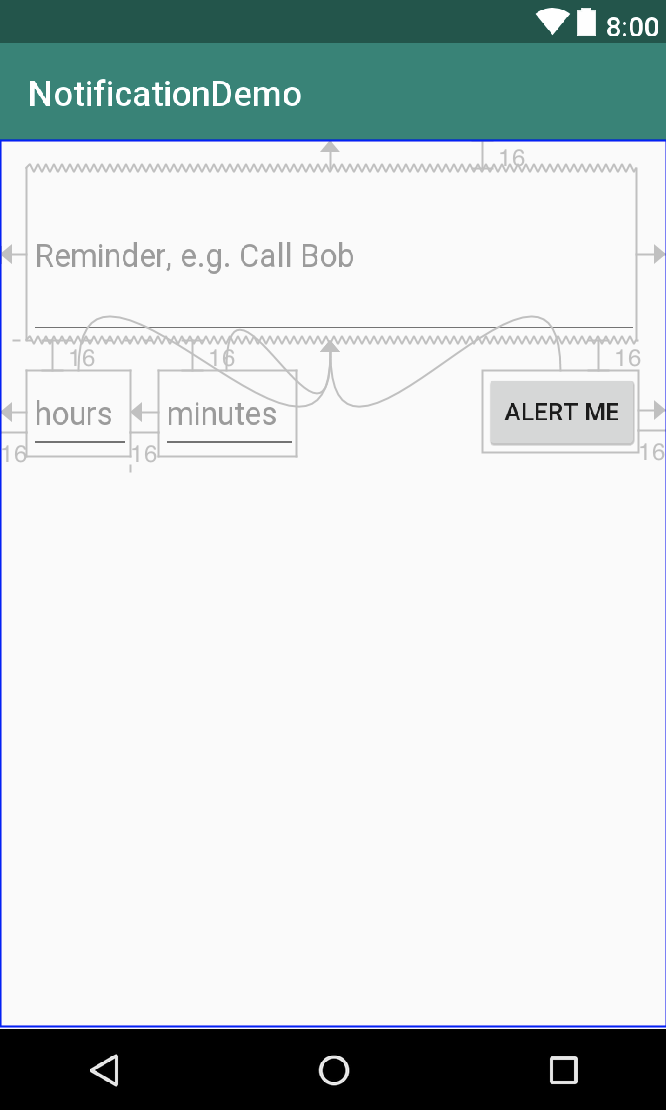 The EditText elements should have ids of etMessage, etHours and etMinutes. Note that the Hours and Minutes EditTexts should use the 'number' input type
Example XML for this (without String resources) is below (Click to expand)
<?xml version="1.0" encoding="utf-8" ?> <android.support.constraint.ConstraintLayout xmlns:android="http://schemas.android.com/apk/res/android" xmlns:app="http://schemas.android.com/apk/res-auto" xmlns:tools="http://schemas.android.com/tools" android:layout_width="match_parent" android:layout_height="match_parent" tools:context=".MainActivity"> <EditText android:id="@+id/etMessage" android:layout_width="0dp" android:layout_height="100dp" android:layout_marginBottom="16dp" android:layout_marginEnd="16dp" android:layout_marginLeft="16dp" android:layout_marginRight="16dp" android:layout_marginStart="16dp" android:layout_marginTop="16dp" android:ems="10" android:hint="e.g. Call Bob" android:inputType="textMultiLine" app:layout_constraintEnd_toEndOf="parent" app:layout_constraintStart_toStartOf="parent" app:layout_constraintTop_toTopOf="parent" /> <Button android:id="@+id/button" android:layout_width="wrap_content" android:layout_height="wrap_content" android:layout_marginEnd="16dp" android:layout_marginRight="16dp" android:layout_marginTop="16dp" android:text="Alert Me" app:layout_constraintEnd_toEndOf="parent" app:layout_constraintTop_toBottomOf="@+id/etMessage" /> <EditText android:id="@+id/etHours" android:layout_width="60dp" android:layout_height="50dp" android:layout_marginLeft="16dp" android:layout_marginStart="16dp" android:layout_marginTop="16dp" android:ems="10" android:hint="Hours" android:inputType="number" app:layout_constraintStart_toStartOf="parent" app:layout_constraintTop_toBottomOf="@+id/etMessage" /> <EditText android:id="@+id/etMinutes" android:layout_width="80dp" android:layout_height="50dp" android:layout_marginLeft="16dp" android:layout_marginStart="16dp" android:layout_marginTop="16dp" android:ems="10" android:hint="Minutes" android:inputType="number" app:layout_constraintStart_toEndOf="@+id/etHours" app:layout_constraintTop_toBottomOf="@+id/etMessage" /> </android.support.constraint.ConstraintLayout> - Add appropriate String resources where String literals appear above
-
In the MainActivity class, add a method as follows:
fun scheduleAlert(view: View){ } -
Add the following code to the above method to create variables with the values from the UI:
Note the use of the Elvis operator (val message = binding.etMessage.text.toString() val hours = binding.etHours.text.toString().toLongOrNull() ?: 0 val mins = binding.etMinutes.text.toString().toLongOrNull() ?: 0 val delay = (hours * 60) + mins?:) which will set the value of the hours and mins variables to 0 if the conversion of the value in them results in null being returned. - We will return to this method later, but for now add an onClick handler to the Button in the XML to call this newly added method
Creating notifications
Initially, it would be possible to put all the logic for creating notifications in the Activity, however later we will want notifications to be fired by a service (i.e. when the app is not running), so this would cause us problems. Also, by creating a class whose responsibility is to create a notification (rather than to also collect the information for the notification from the user) we are adhering to the Single Responsibility Principle
- Create a new Kotlin class called Notifier
- Much of the process of creating a notification, such as getting String resources, creating Intents and the NotificationBuilder class itself relies on access to a Context object. If we had been creating the notification in the Activity, we would have access to a Context object, because Activity is a Context i.e. Activity extends the Context class. To ensure we have access to a context, it makes sense to pass the context in the constructor for Notifier. Modify the declaration of the Notifier class as follows:
You'll need to add an import for android.content.Contextclass Notifier(val context: Context) { } - On devices running Android Oreo and above, to send notifications requires a notification channel to be created. The next stage is to create a method which will configure a notification channel. A channel requires a name and a description, so add String resources to your strings.xml file as follows:
<string name="channelName">Reminders</string> <string name="channelDescription">Reminders you\'ve added</string> - Next add the following method to the Notifier class:
Looking through the code we first create variables to represent the channels name, description, provide an Id unique to the app (which is a string) and specify the importance of notifications provided by the channel. We then create the channel object, get a reference to the NotificationManager and register the channel with itprivate fun createNotificationChannel(){ if (Build.VERSION.SDK_INT >= Build.VERSION_CODES.O) { val channelName = context.getString(R.string.channelName) val channelDescription = context.getString(R.string.channelDescription) val channelId = channelName val importance = NotificationManager.IMPORTANCE_DEFAULT val channel = NotificationChannel(channelId, channelName, importance).apply { description = channelDescription } val notificationManager: NotificationManager = context.getSystemService(Context.NOTIFICATION_SERVICE) as NotificationManager notificationManager.createNotificationChannel(channel) } } - The method we've just added should run whenever we create an instance of the Notifier class, so create an init block for the class and add a call to
createNotificationChannel()to it
Creating the notification
The next stage is to add a method which will create and return a Notification object.
- Add the following method stub to the Notifier class:
private fun notification(title: String, content: String) : Notification { } - When we create an notification, we must provide a small icon. For this we will use a small tick icon from the Android Material design library. This link should take you to the selected icon: Tick icon. Using the left hand menu, download the Android package for the icon as a PNG. Extract the ZIP file, and then drag the folders within it (with the exception of the one labelled just 'drawable') into the 'res' folder. You will probably need to do this using the computer's file browser, rather than dragging into android studio
- Various sizes of icon will have been downloaded, remove the ones other than those sized at 18
- USing the menu, click 'Build' then 'Make Project' and check it builds successfully
- Add the following code to the
notificationmethod to create a notification:val builder = NotificationCompat.Builder(context, context.getString(R.string.channelName)) builder.setSmallIcon(R.drawable.baseline_done_outline_black_18) builder.setContentTitle(title) builder.setContentText(content) builder.priority = NotificationCompat.PRIORITY_DEFAULT return builder.build()
Sending the notification
To send a notification, we use a notification manager, and provide it with a notification, and an Id. The id should be unique, and could be used to update a notification in future. This example uses a hashcode of the title to generate an Id, which, whilst uniqueness of a hashcode is not guaranteed, given the relatively low number of notifications the user is likely to set, the probability of two notifications with different titles having the same hashcode will be low, so it will suffice in this instance
- Add the following method to the Notifier class:
fun sendNotification(title: String, content: String){ val notification = notification(title, content) with(NotificationManagerCompat.from(context)){ val notificationId = title.hashCode() //pretty much unique notify(notificationId, notification) } } - Return to the MainActivity class and at the bottom of the
scheduleAlertmethod add the following code:
Note that the content part of the notification is not used - you can add text here if you want to see how the notification content can appearval notifier = Notifier(this) notifier.sendNotification(message,"") - Run the application and enter some text into the top EditText element, then press the button. An notification should be heard, and swiping down from the top of the screen will show the notification. At present nothing will happen when it is clicked on.
Responding to taps on a notification
Currently, if you tap on a notification, nothing will happen. To remedy this, we'll create a new activity, which displays a textView full screen
- Add a new empty activity called ViewReminderActivity
- Add a TextView with an id of tvMessage that fills the activity
- Add the following code at the bottom of the
onCreatemethod which will check for an intent extra called "title" and use it to set the message (assuming it's found):
Note the use of the Elvis operator again, (binding.tvMessage.text = intent.getStringExtra("title") ?: ""?:) which will set the value of the text property to an empty string if thegetStringExtra()method returns null - The above code will only work if we can specify an intent which can launch the ViewReminderActivity. This involves creating an Intent, and then because we can't launch the intent immediately, we create a PendingIntent object which is included in the notification. At the top of the Notifier class's
notificationmethod, add the following code:
Note that the flag being set ensures that a new instance of the activity is created, that way if another notification is open in the app, when a new one is opened from the notification, the old one will be revealed after the user presses the back buttonval intent = Intent(context, ViewReminderActivity::class.java).apply { flags = Intent.FLAG_ACTIVITY_NEW_TASK } intent.putExtra("title",title) - Next below the code you just added (and above the code the builds the notification), add this code to create a PendingIntent:
This time, we specify a unique(ish) request code based on the notification title, and create a PendingIntent object which contains the intent, as well as a flag which means that if we tried to create the pending intent again (i.e. with the same request code), any intent extras would be replacedval requestCode = title.hashCode() val flag = if (Build.VERSION.SDK_INT >= Build.VERSION_CODES.M) { PendingIntent.FLAG_IMMUTABLE } else { PendingIntent.FLAG_UPDATE_CURRENT } val pendingIntent = PendingIntent.getActivity(context,requestCode, intent, flag) - Finally, add the following line before the return statement to add the pending intent to the notification:
builder.setContentIntent(pendingIntent) - Run the application again, create a few reminders, then using the swipe down gesture, view them, and check that when you click on each one, you view the correct reminder in the app. Note also that if you view a few in succession, without using the back button, when you use the back button the previous ones should be shown before you reach the MainActivity.
Scheduling notifications with a started service
The main flaw in our application so far, is that the notifications fire immediately. Typically we want to be reminded of something later, because we don't want to, or can't, do it now. We also need to consider that a user may leave our application, so we cant just add a thread or a runner to the Activity or Notifier class. Instead we need to create a Service
- Using the context menu, add a new Service to your application (right click on the java folder and choose New -> Service -> Service from the menu)
- Name it NotificationService and un-check the 'Exported' option (which would make it available outside your app), but leave the Enabled box checked
- A service will be created and a new 'service' element added to the AndroidManifest.xml file - check this is the case
- There are two types of service - a bound service, which can interact with the component that launched it (which we do not need), and which requires us to implement a method called
onBindand a started service, which doesn't. Whilst we will create a started service, we still need to specify that the onBind method returns null, however if we modify the code (likely showing as aTODOat this point, it will complain because it expects an IBinder object, and Kotlin won't allow as to return null if the return type is not nullable. To remedy this, modify the return type of the method to return a Nullable IBinder object (i.e. by adding a question mark) and change the body of the method to return null. - Next implement the
onStartCommandmethod. The code completion will help you do this with the required parameters (intent, flags and startId) - Change the return statement in this method to
This ensure that it will continue running unless the user terminates it manually or the device runs out of resources to keep it running, which, hopefully, it won'treturn START_STICKY - This
onStartCommandmethod will be responsible for creating the notification via the Notifier class, so it will need the various parameters, unfortunately, however, we can't adjust the method signature, so the title, content text (which we're not using, but could do in future) and the delay values all need to be passed via intent extras. Add the following lines of code which extract these values from an intent:val title = intent?.getStringExtra("title") ?: "" val content = intent?.getStringExtra("content") ?: "" val delayMins = intent?.getLongExtra("delay", 0) ?: 0L - The next thing we need to be aware of, is that the service runs on the same thread as the app, so we will need to create something that can be run in a thread. Although we've used a Thread object for this in the past, and passed an instance of Runnable in, we want to be able to delay the notification. This is easier to do if we use a Handler object. Add the following code to firstly create the runnable Object:
Note that a Service also inherits from Context, so we can passval runner = Runnable { val notifier = Notifier(this) notifier.sendNotification(title, content) }thisto the Constuctor of Notifier, in the same way we could when creating a notifier in an Activity - Next, create a Handler object, then call it's
postDelayedmethod, passing in the runner and the delay as follows:val handler = Handler(Looper.getMainLooper()) handler.postDelayed(runner,1000*delayMins) - Be aware that the delay is calculated by multiplying the number of minutes by the number of milliseconds in a second, this means that when a user specified a delay of 1 minute, it will actually result in a delay of one second. Add a TODO statement at the end of the line which has the calculation as follows:
//TODO: multiply by 60 after testing - Return to the MainActivity class
- remove the code that creates the notifier and calls the notifier's send message method
- Add the following code to create ab Intent for the NotificationService class, set extras for the title and delay, and start the service as follows:
Note that we could specify an extra for the Notification content, but as we don't have anything to put in it, we have omitted itval intent = Intent(this, NotificationService::class.java) intent.putExtra("title",message) intent.putExtra("delay", delay) startService(intent) - Run the application and set a delay of a few minutes (which will actually be a few seconds). Check that it works
- Try again, but set a longer delay, and close the app using the home button, and verify that the notification still appears
- Finally it would be nice if once an reminder has been set, the EditText elements are cleared and the user is informed. Add the following code to clear the fields and notify the user with a Toast:
binding.etHours.text.clear() binding.etMinutes.text.clear() binding.etMessage.text.clear() Toast.makeText(this,"Reminder to $message set in $delay minutes",Toast.LENGTH_SHORT).show() - Fix the outstanding
//TODO:, so that a minute represents a minute, rather than a second and test the application one final time
A completed version of this project can be downloaded from Github
Further tasks
- Add functionality for the user to choose a date and time for the notification to launch
- Add functionality so that a user can review pending notifications and delete them (this will require some further reading)
- Add a snooze function, (9 minutes being the length of a snooze)