Recycler Views
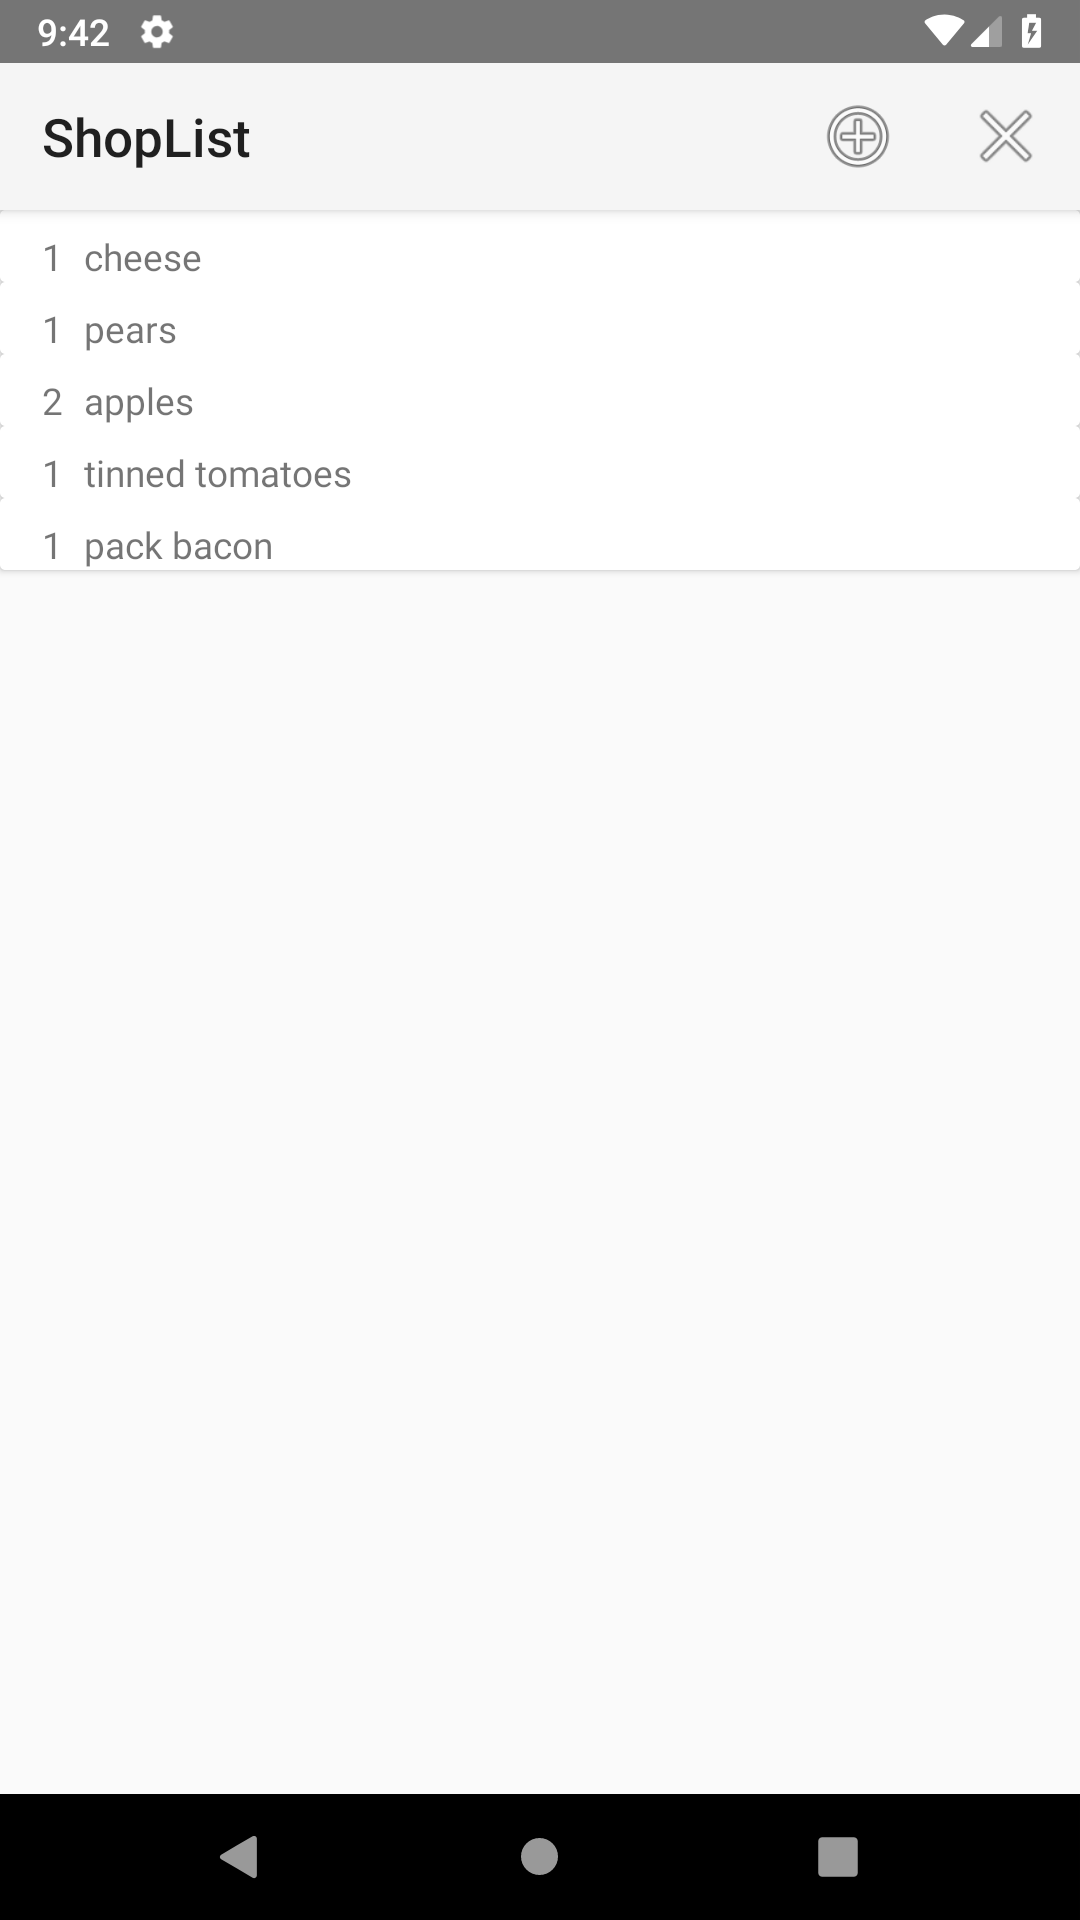
This tutorial will take you through the development of a simple application with the functionality of a shopping list which uses a RecyclerView. RecyclerView is a newer, more efficient way of displaying lists in Android, when the lists are likely to update
Getting started
- Create a new Android project, name it "ShopList", targeting a minimum API of 24 and using the empty activity template. Use the default name for the main activity
- Enable view binding in the Gradle build file, if neccessary, and create a binding property for MainActivity, named
binding -
The application displays a list of things to buy, and for each of these the quantity needed. The first tasks therefore, is to create a class to represent an item on the shopping list. Create a new Kotlin class inside the shoplist package called ShoppingListItem and configure it as follows:
class ShoppingListItem(val name: String, var count: Int) { var purchased : Boolean = false } -
At a later point, we will want to serialise instances of this class to disk, so add the following code to implement the serializable interface as follows
import java.io.Serializable

class ShoppingListItem(val name: String, var count: Int) : Serializable {

    var purchased : Boolean = false
}
Adding a toolbar and menu
The application is going to require a menu that provides options for the user to add a new item to the list, and also to remove items which have been located.
-
Firstly we want to disable the existing ActionBar, so that it can be replaced with a Toolbar. Open the AndroidManifest file (inside the manifests folder) and replace the line that starts
android:themewith the following:
Be careful not to remove the closing angular bracket (android:theme="@style/Theme.AppCompat.Light.NoActionBar">) if it is at the end of this line. - Open the activity_main.xml file and remove the existing TextView component.
-
Add a Toolbar from the Palette to the view, and then modify the XML so it matches the following:
<androidx.appcompat.widget.Toolbar android:id="@+id/toolbar" android:layout_width="0dp" android:layout_height="?android:attr/actionBarSize" android:background="@color/colorPrimary" android:elevation="4dp" android:minHeight="?android:attr/actionBarSize" app:layout_constraintEnd_toEndOf="parent" app:layout_constraintStart_toStartOf="parent" app:layout_constraintTop_toTopOf="parent" /> -
Switch to the MainActivity.kt file, and add the following method to the
onCreatemethod:setSupportActionBar(binding.toolbar) - Next add a folder named 'menu' to the 'res' folder (right click on the res folder to bring up a context menu and choose new -> directory)
- Right click on the newly added 'menu' folder and choose new -> Menu resource file.
- In the prompt that appears, name the resource 'menu_main' and leave the remaining options unchanged
- Open the newly added file, and in the design, drag two Menu Items onto the toolbar (they will appear underneath it)
-
Switch to the text view and modify the XML for the menu items so it appears as follows (you will need to make string resources for the
titleattributes in both cases):<item android:id="@+id/menu_insert" android:icon="@android:drawable/ic_menu_add" android:title="@string/add_new_item" app:showAsAction="ifRoom|withText" /> <item android:id="@+id/clear_complete" android:icon="@android:drawable/ic_menu_close_clear_cancel" android:title="@string/clear_found_items" app:showAsAction="always" /> -
If we were to run the application at this point, we would still not see the menu. This is because we need to override the
onCreationOptionsMenumethod in the MainActivity to inflate the menu. Override this method as follows:
Add the import statement for menu when promptedoverride fun onCreateOptionsMenu(menu: Menu?): Boolean { menuInflater.inflate(R.menu.menu_main, menu) return super.onCreateOptionsMenu(menu) } - Run the application and verify that the toolbar now has two icons on it (a plus and a cross)
Adding support for RecyclerView
RecyclerView is part of a support library that lets newer Android features be added to apps supporting older versions of Android. To add this support we need to modify the dependencies for our appliction.
-
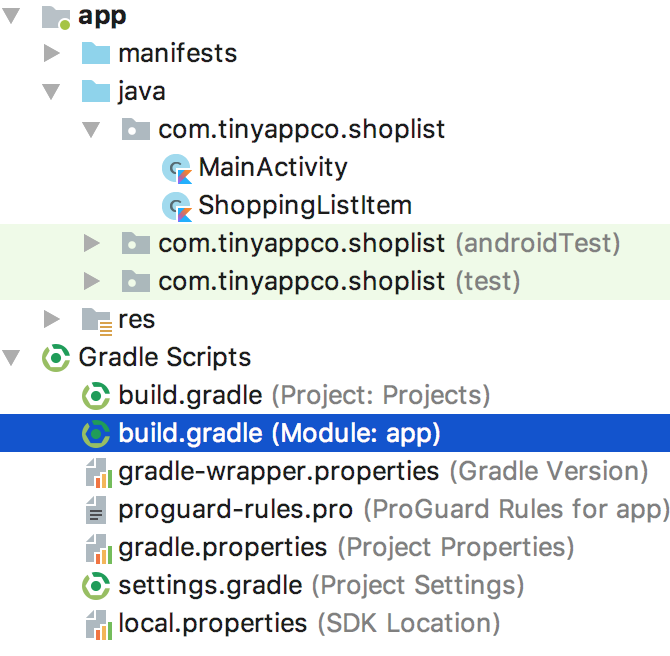
Open the build.gradle file for the module as shown here:
-
Within the dependencies block, add the following code:
implementation ("androidx.recyclerview:recyclerview:1.3.2") -
We will also be using a cardview as part of this project, so to save time, add a dependency for that also as follows:
implementation ("androidx.cardview:cardview:1.0.0") - Android studio should now show a prompt at the top of the window stating that Gradle files have changed. Click 'Sync now' in the prompt.
Adding the RecyclerView to the main activity layout
- Add a RecyclerView from the Palette, and give it an id of 'rvShoppingList'
-
Modify the XML for the RecyclerView so it appears as follows:
<androidx.recyclerview.widget.RecyclerView
    android:id="@+id/rvShoppingList"
    android:layout_width="0dp"
    android:layout_height="0dp"
    app:layout_constraintBottom_toBottomOf="parent"
    app:layout_constraintEnd_toEndOf="parent"
    app:layout_constraintStart_toStartOf="parent"
    app:layout_constraintTop_toBottomOf="@+id/toolbar" />
LayoutManager for the RecyclerView
In order for a RecyclerView to display a list of items it needs both a LayoutManager and a RecyclerAdapter (which we'll cover later). The LayoutManager determines how the items in the RecyclerView are laid out, for example one after the other (linear) in a regular grid, or even in a staggered grid layout. For each of these scenarios Android provides a pre-existing layout manager (LinearLayoutManager, GridLayoutManager and StaggeredGridLayoutManager respectively).
-
This project will layout the shopping list items in a linear fashion, so in MainActivity.kt, add the following property to the MainActivity class:
Note the use ofprivate lateinit var layoutManager: RecyclerView.LayoutManagerlateinit. Add the import statement as prompted -
In the
onCreatemethod, add code to instantiate the LayoutManager as follows:
Again, add the appropriate import statement.layoutManager = LinearLayoutManager(this)
Creating a card view
The layout manager just defines how items in the RecyclerView are laid out, it doesn't define the internal structure of individual items within the layout. We can use a CardView to determine how each individual item is laid out. It might help to imagine the LayoutManager as determining how boxes are arranged, and the CardView as determining the arrangement of items within a box.
- Add a new Resource file to the layout folder (in the res folder). Name it card_layout and set the root element to androidx.cardview.widget.CardView (this can be easily added by starting to type 'CardView' and using the autosuggest option). Leave other options unchanged.
- Within the CardView one of the different types of layout needs to be specified. This task could be achieved with a few different options, but for now drag a ConstraintLayout from the Palette onto the CardView.
- Set the CardView's layout_height attribute to wrap_content, so that it only appears as large as the content it contains. Otherwise, each card would fill the whole screen and only one item would be viewable in the RecyclerView at any one item.
-
Whilst a card view could be quite complex, including a number of different types of views from the pallette, ours will be simple, with just two text views, one for the count of items, the second for the name of the item. Using the below image as a guide, try and configure the CardView to appear as shown.
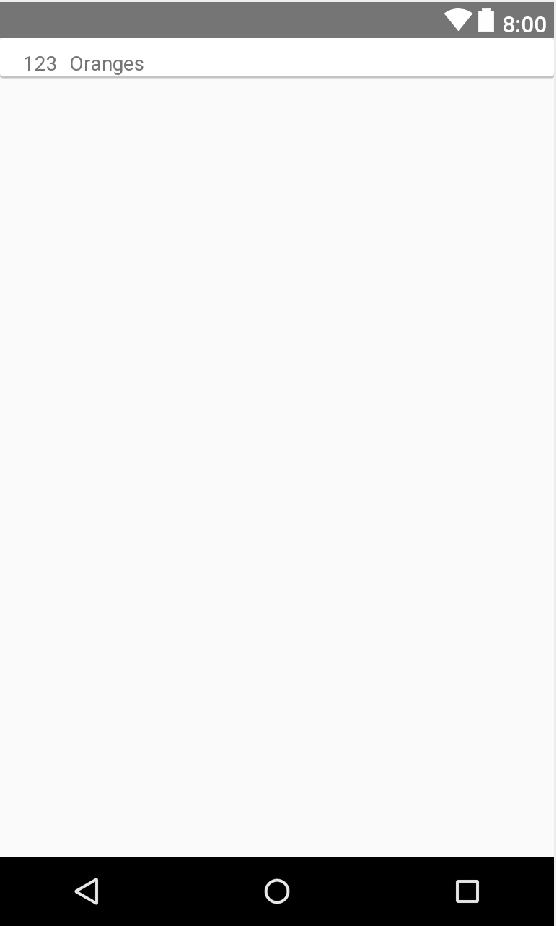 Note that for different screen sizes, only the item product name textview should grow. The smaller TextView should be named tvCount and the larger tvProduct. The XML below can be used (inside the ConstraintLayout) if you are struggling:
<TextView android:id="@+id/tvCount" android:layout_width="wrap_content" android:layout_height="wrap_content" android:layout_marginEnd="8dp" android:layout_marginLeft="16dp" android:layout_marginRight="16dp" android:layout_marginStart="16dp" android:layout_marginTop="8dp" app:layout_constraintEnd_toStartOf="@+id/tvProduct" app:layout_constraintStart_toStartOf="parent" app:layout_constraintTop_toTopOf="parent" tools:text="123" /> <TextView android:id="@+id/tvProduct" android:layout_width="0dp" android:layout_height="wrap_content" android:layout_marginEnd="8dp" android:layout_marginRight="16dp" android:layout_marginTop="8dp" app:layout_constraintEnd_toEndOf="parent" app:layout_constraintStart_toEndOf="@+id/tvCount" app:layout_constraintTop_toTopOf="parent" tools:text="Oranges" /> -
If you see an error with the above, you may need to manually add one or both of the following attribute and value pair to the CardView itself:
xmlns:tools="http://schemas.android.com/tools" xmlns:app="http://schemas.android.com/apk/res-auto" - It's also possible to make the preview of the RecyclerView display the CardView preview as example items. To do this, either set the listItem attribute in the UI designer for the RecyclerView to @layout/card_layout, or add the following property to the RecyclerView in the XML:
tools:listitem="@layout/card_layout"
The RecyclerView Adapter
In order to 'connect' the RecyclerView with the items in the CardView, we must implement the RecyclerView.Adapter abstract class. An abstract class is a class which contains one or more abstract methods. Unless you know what an abstract method is, then this definition is somewhat useless. An abstract method is one which is declared, but not implemented. This is similar to how methods are declared in interfaces. It is possible for both abstract classes and interfaces to implement methods in Kotlin, however it is not possible for an interface to store state, whereas an abstract class can. Abstract classes cannot be instantiated, they must be subclassed and any abstract members implemented (overridden).
There is another complexity to the RecyclerView.Adapter class in that it is typed. We've seen similar syntax to this before, in collections - for example we can create ArrayList<String> but we could also create ArrayList<Banana>. With RecyclerView.Adapter we are must specify a type when we extend it, though rather than being able to specify any type (like we can do with ArrayList) we are restricted to using a type that extends RecyclerView.ViewHolder (which is itself an abstract class that we must implement)
- Add a new Kotlin class to the shoplist package named RecyclerAdapter.
-
Next, specify that the class extends the RecyclerView.Adapter abstract class, and that it's type will be a RecyclerAdapter.ViewHolder. The code for this is as follows:
Be aware that for now it will error because the typeclass RecyclerAdapter : RecyclerView.Adapter<RecyclerAdapter.ViewHolder>() { }RecyclerAdapter.ViewHolderdoes not exist, and also because we haven't implemented the abstract members of the class - Set up a binding for this, so we can access the text views in the card layout, by adding the following code inside the class:
val binding = CardLayoutBinding.bind(itemView) -
Next add an inner class (inside the RecyclerAdapter class) which will implement the RecyclerView.ViewHolder class as follows:
Note that RecyclerView.ViewHolder's primary constructor requires a view to be passed as a parameter. We create our class to follow the same pattern, also requiring a view as a parameter in the primary constructor, and we then pass that view 'up the chain' into the constructor of the base class.inner class ViewHolder(itemView: View) : RecyclerView.ViewHolder(itemView) { } - We'll come back to the ViewHolder shortly, but before that we'll deal with another outstanding error. Our RecyclerAdapter class does not implement the abstract members from the base class. Using the lightbulb hint prompt, choose the 'implement members option' and on the following screen, select all three methods and click OK. Three methods will be added to the code.
-
You may well be wondering how the RecylerView knows what layout to use. Once the RecyclerView has been hooked up to the RecyclerAdapter (which is not done yet) the recycler adapter inflates the appropriate view. To do this, remove the existing body of the onCreateViewHolder method, then add the following code:
Add the import statement when prompted.val view = LayoutInflater.from(parent.context).inflate(R.layout.card_layout, parent,false) return ViewHolder(view)Look carefully at this code, to see what's happening. The card layout we created earlier is inflated, which creates a view. This view is then passed into the constructor for the ViewHolder. If we wanted to add further functionality that applies to each ViewHolder, we could implement an init method for ViewHolder. Because ViewHolders can be reused, however, we wouldn't configure anything which differs from one cardview to another here.
-
To ensure that the cardholder show different data from one another (i.e. to show each shopping list item) we can implement the
onBindViewHoldermethod. As we don't yet have a list of shopping items, for now, add the following code to that method:
You'll be prompted to add an import statement for the card layout view, so do that. The eventual result of this will be that every item in the list will be "Bananas" (or "Banana" when there is just one) but the count will correspond to the items position in the listholder.binding.tvCount.text = position.toString() holder.binding.tvProduct.text = if (position == 1) "Banana" else "Bananas" -
The RecyclerAdapter also needs to know how any items should appear in the list - this is the
getItemCountmethod. Remove the boiler plate code and modify this so it returns 125 for now. -
Return to MainActivity.kt and add the following property to the class:
private lateinit var adapter: RecyclerAdapter -
Next add the following code to the end of the
onCreatemethod:binding.rvShoppingList.layoutManager = layoutManager adapter = RecyclerAdapter() binding.rvShoppingList.adapter = adapter - Run the application and ensure that you have a scrollable list of shopping, for a lot of bananas.
-
Modify the
getItemCountin the RecyclerAdapter to returnInteger.MAX_VALUE - Run the application again, and you will see that it is still responsive, but you can scroll a whole lot further through the list!
User defined shopping items
At present the application can demonstrate a RecyclerView in action, but little else. At the start of the project, we created a class to represent a shopping item. We'll modify the code so that items from a collection of ShoppingListItem objects are displayed instead.
-
Add the following code to the RecyclerAdapter class to create and instantiate an MutableList of ShoppingListItems:
var list = mutableListOf<ShoppingListItem>() -
So that the list is not blank, until we add functionality for the user to add items, add the following code to the RecyclerAdapter class:
init{ list.add(ShoppingListItem("bread",2)) val cheese = ShoppingListItem("cheese",1) cheese.purchased = true list.add(cheese) } -
Modify the
getItemCountmethod so it returns a count of the items in the list (don't just return 2!) -
Replace the code in the
onBindViewHoldermethod with the following which will access the values from the MutableList, such that the index of the RecyclerView is used to retrieve the data at the corresponding index of the MutableList:val cardView = viewHolder.binding val item = list[position] cardView.tvCount.text = item.count.toString() cardView.tvProduct.text = item.name - Run the app again, and check that is shows 2 bread and 1 cheese.
-
You might also wonder what the 'purchased' property of the ShoppingListItem class is used for. This is designed to enable the user to indicate items they've found, before they are removed from the list. This will be done by using strikethrough on the text. Adding text decoration in Android is not the simplest, as we need to set a bit on the textview's
paintFlagson the textview (there's no method on TextView that will toggle strikethrough on and off).paintFlagsis a bitfield (represented as an integer), so we need to flip the appropriate bit to toggle strikethrough on and off, but we do not want to mess with any other bits that are set. Rather than write in the RecyclerAdapter, Kotlin allows us to add methods to existing classes, so we can add our owntoggleStrikethroughmethod to the TextView class and use it throughout our application. Add a new Kotlin file called "Extensions" to the project -
Within the newly added file, add the following method:
You will also need to add import statements for Paint and TextView. Note that there is no class containing this method, so this method is available on the TextView class anywhere within our project.fun TextView.toggleStrikeThrough(on: Boolean) { if (on){ this.paintFlags = this.paintFlags or Paint.STRIKE_THRU_TEXT_FLAG } else { this.paintFlags = this.paintFlags and Paint.STRIKE_THRU_TEXT_FLAG.inv() } } -
Return to the RecylerAdapter and add the following code to the
onBindViewHoldermethod as follows:if (item.purchased){ cardView.tvProduct.toggleStrikeThrough(true) cardView.tvCount.toggleStrikeThrough(true) } - Run the application again and check that the cheese item only is struck out.
Interacting with individual items
We can now show a strikethrough for items on our list, but we need the user to be able to toggle the strikethrough by tapping on an item in the RecyclerView. The way to do that is to add an onClickListener to each view in the recyclerview.
-
Add the following
initmethod to the RecyclerAdapter's inner ViewHolder class as follows:
The first line uses the position of the ViewHolder within the RecyclerView Adapter to locate the ShoppingListItem object at the corresponding point in the MutableList and invert it's purchased property. Using the value of that property we then toggle the strikethrough for both the count and the name of the itemclass ViewHolder(itemView: View) : RecyclerView.ViewHolder(itemView) { init{ itemView.setOnClickListener { list[bindingAdapterPosition].purchased = !list[bindingAdapterPosition].purchased binding.tvProduct.toggleStrikeThrough(list[bindingAdapterPosition].purchased ) binding.tvCount.toggleStrikeThrough(list[bindingAdapterPosition].purchased) } } } - Run the application again and check that individual items on the list can have the strikethrough enabled and disabled when tapped
Removing items
Once the user has toggled items that they've found during their shopping trip, they should be able to remove them from the list. The menu item with the cross icon should implement this behaviour
-
First, we'll create a method in RecyclerAdapter that removes found items (i.e. ones where the purchased property is set to true, and that display with a strikethrough. To do this we need to mutate the list as we iterate through it, so to do this safely, we use an iterator. The syntax for this is similar to a Java iterator. Finally, we need to notify the RecyclerView that the data set has changed so it can redraw the views. Add the following method to the RecyclerAdapter class to do this:
fun removeFoundItems(){ val iterator = list.iterator() while (iterator.hasNext()){ val item = iterator.next() if (item.purchased){ iterator.remove() } } notifyDataSetChanged() } - In MainActivity.kt, override the
onOptionsItemSelected(item: MenuItem?) : Booleanmethod by starting to type it's name and choosing the autocomplete option -
This method is a hook which allows us to implement logic for a given menu item. If we implement menu logic here, we should return true (otherwise we would allow default menu handling by returning the result of calling the method in the superclass). Add the following code to the
onOptionsItemSelectedmethod before the existing line that returns the base implementation:if (item.itemId == R.id.clear_complete){ adapter.removeFoundItems() return true } - Run the application, ensure one of the items has been toggled to display with strikethrough and press the 'X' menu item. Observe that this item disappears
Adding new items
In order to add new items we need to implement logic to add it to the RecyclerView, and also provide an Activity which the user can use to add items
-
Start by adding the following method to the RecyclerAdapter, which will allow a new ShoppingListItem to be added:
Note that as well as adding it to the list, we also notify the RecyclerAdapter that an item has been inserted at a given position. It is more efficient thanfun addItem(item: ShoppingListItem){ list.add(item) notifyItemInserted(list.lastIndex) }notifyDataSetChanged()as other items in the list are not rebound (though their positions may have changed). As you may expect, there is a correspondingnotifyItemRemoved()method, which we could have used earlier, and which would have been a better approach - Next, create a new Empty Activity called AddItemActivity
- Setup a view binding, called
bindingin the usual way -
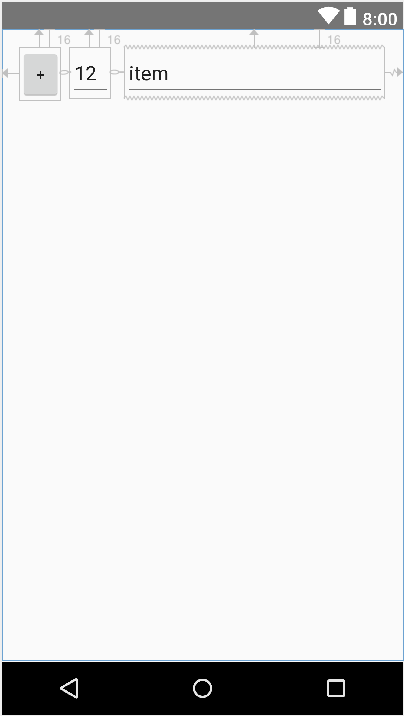
Configure the activity as shown in the screen shot below with a button and two EditText elements with the following properties:
- Button: id of btnIncrementCount
- Left EditText: id of etCount and inputType attribute set to number
- Right EditText: id of etItem
 >
>
- The size of the button and initial TextView should be fixed, but the size of the second TextView should match the constraint, such that it expands on wider devices. Try to create this layout yourself, but if you are really struggling,
example XML can be seen here: (click to expand)
<?xml version="1.0" encoding="utf-8" ?> <androidx.constraintlayout.widget.ConstraintLayout xmlns:android="http://schemas.android.com/apk/res/android" xmlns:app="http://schemas.android.com/apk/res-auto" xmlns:tools="http://schemas.android.com/tools" android:layout_width="match_parent" android:layout_height="match_parent" tools:context=".AddItemActivity" tools:layout_editor_absoluteY="25dp"> <Button android:id="@+id/btnIncrementCount" android:layout_width="37dp" android:layout_height="wrap_content" android:layout_marginEnd="8dp" android:layout_marginLeft="16dp" android:layout_marginRight="8dp" android:layout_marginStart="16dp" android:layout_marginTop="16dp" android:text="@string/plus_sign" app:layout_constraintEnd_toStartOf="@+id/etCount" app:layout_constraintStart_toStartOf="parent" app:layout_constraintTop_toTopOf="parent" /> <EditText android:id="@+id/etItem" android:layout_width="0dp" android:layout_height="wrap_content" android:layout_marginEnd="16dp" android:layout_marginRight="16dp" android:layout_marginTop="16dp" android:ems="10" android:hint="@string/apples" android:inputType="text" app:layout_constraintEnd_toEndOf="parent" app:layout_constraintStart_toEndOf="@+id/etCount" app:layout_constraintTop_toTopOf="parent" tools:text="item" /> <EditText android:id="@+id/etCount" android:layout_width="37dp" android:layout_height="wrap_content" android:layout_marginEnd="12dp" android:layout_marginRight="12dp" android:layout_marginTop="16dp" android:ems="10" android:hint="@string/_1" android:inputType="number" android:text="@string/_1" app:layout_constraintEnd_toStartOf="@+id/etItem" app:layout_constraintStart_toEndOf="@+id/btnIncrementCount" app:layout_constraintTop_toTopOf="parent" tools:text="12" /> </android.support.constraint.ConstraintLayout> -
Rather than the user be forced to type the number of each item, the '+' button should enable the user to increment the count. Add the following method to do that:
private fun incrementCount() { var userCount = binding.etCount.text.toString().toIntOrNull() if (userCount == null) { userCount = 1 } binding.etCount.setText((userCount + 1).toString()) } -
Next add an event listener to the
onCreatemethod, so the button calls the above method when pressed as follows:binding.btnIncrementCount.setOnClickListener { incrementCount() } -
You'll notice that there is no 'finish' button in the UI. Instead, we can listen for the event that corresponds to the user tapping the 'Done' button on the soft keyboard. This event could occur on either EditText element, so we want the same 'listener' to apply to both elements. The listener is a
TextView.OnEditorActionListenerand the method we need to implement in the interface is the 'onEditorAction' Rather than duplicate code, we can create an inner class that implements the interface, and pass the same instance of that class as the listener to both EditText elements. Within AddItemActivity, create an inner class namedEnterHandlerwhich implements theTextView.OnEditorActionListenerinterface. You should be able to automatically add method that needs implementing by using the lightbulb popup and choosing 'implement members'. This will result in the code shown below:
The documentation for OnEditorActionListerner advises that for theinner class EnterHandler : TextView.OnEditorActionListener{ override fun onEditorAction(v: TextView?, actionId: Int, event: KeyEvent?): Boolean { } }onEditorActionmethod, we should "Return true if you have consumed the action, else false". We will come back to this shortly. -
Next add code to the AddItemActivity's
onCreatemethod to create the Handler and attach it to both EditText elements:val enterHandler = EnterHandler() binding.etItem.setOnEditorActionListener(enterHandler) binding.etCount.setOnEditorActionListener(enterHandler) -
As we only want to finish with the add item activity when the user has added a product name, we need to be able to check that easily, as well as determine the count of items to add. Add the following method to the AddItemActivity class (allthough these will be called from the inner class (and the code would work if they were located there), they are more appropriate to the responsibility of the Activity in general, so add them there:
Read through the code of both methods to ensure you understand what they doprivate fun validProductName() : Boolean { return binding.etItem.text.length > 0 } private fun productCount() : Int { val userCount = binding.etCount.text.toString().toIntOrNull() return if (userCount == null) 1 else userCount } -
Return to the
onEditorActionmethod and add the following implementation://user has pressed tick button on soft keyboard, or pressed enter key if (actionId == EditorInfo.IME_ACTION_DONE || KeyEvent.KEYCODE_ENTER.equals(event?.keyCode)) { if (validProductName()) { val product = ShoppingListItem(binding.etItem.text.toString(),productCount()) val intent = Intent() intent.putExtra("item", product) setResult(Activity.RESULT_OK, intent) finish() //we have consumed (handled) this event (key press) return true } } //we have not consumed this event (i.e. different key pressed or no valid product entered yet return false -
The final step is to configure the action when the '+' menu item is pressed. Return to the MainActivity and add a result launcher, so we can launch and handle the result from the AddItemActivity in due course:
Later we will add code to handle the resultprivate val resultLauncher = registerForActivityResult(ActivityResultContracts.StartActivityForResult()){ } - Next add the following method:
This is a little lazy as we're supplyingprivate fun addItem() { val intent = Intent(this,AddItemActivity::class.java) resultLauncher.launch(intent) }0instead of a named constant for the request code parameter. If we were to present more than one Activity from this Activity, we would need to revisit this so we could tell their results apart -
Next add this code to the
onOptionsItemSelectedmethod, before the final return statement:if (item.itemId == R.id.menu_insert){ addItem() return true } - Test the application, at this stage it should be possible to navigate to the AddItemActivity, but when returning to the MainActivity, the new item will not yet appear in the list
Handling newly added items
-
In order to handle the data passed back from the AddItemActivity to MainActivity, we need to add logic to the result handler for the result launcher we created in MainActivity. Add the following code to it:
if (it.resultCode == Activity.RESULT_OK) { val newItem = it.data?.getSerializableExtra("item") as ShoppingListItem adapter.addItem(newItem) } -
Test the application. At this stage, it should work, but the user will have to tap on one of the text fields to bring up the keyboard. It would be handily if the product field was selected and the keyboard showing when the activity starts. Add the following code to the AddItemActivity's
onCreatemethod:binding.etItem.requestFocus() //display keyboard window.setSoftInputMode(WindowManager.LayoutParams.SOFT_INPUT_STATE_VISIBLE) - Restart the app and check that when the AddItemActivity loads the keyboard is visible and ready to add text to the product EditText element
Dragging items
A couple of problems persist with the application, that it does not persist if the application is terminated, and it's still not really any better than using a paper and pencil. As software developers we often look to optimise things, and why not extend that to shopping? If the user could drag products on the list into the order they want (for example the order they navigate the supermarket) the application would be more useful.
- Add an inner class called
DragCallbackto the MainActivity that implementsItemTouchHelper.Callback - Implement the missing members (three methods) using the prompt
-
We are only concerned with up and down swiped, so implement the
getMovementFlagsmethod as follows:val dragFlags = ItemTouchHelper.UP or ItemTouchHelper.DOWN return makeMovementFlags(dragFlags, 0) -
Assuming a move is made we want to notify the RecyclerView of that, so implement the
onMovemethod as follows:adapter.notifyItemMoved(viewHolder.bindingAdapterPosition,target.bindingAdapterPosition) return true - Remove the
TODOboilerplate code from onSwiped (the documentation instructs us that if we don't support swiping, this method will never be called, and as it doesn't return anything, we don't need to implement it -
Next, add a method to MainActivity (not the inner class you just created) to set up dragging as follows:
private fun handleDragging(){ val dragCallback = DragCallback() val touchHelper = ItemTouchHelper(dragCallback) touchHelper.attachToRecyclerView(binding.rvShoppingList) } - Add a call to this method in the
onCreatemethod - Run the application, long press on an item then drag it to a different position. Add a new item and verify that the new position is maintained.
Persisting data between app launches
Saving to disk is reasonably simple as our ShoppingListItem already implements Serializable
-
Add the following method to MainActivity to save the list of products to file:
private fun saveList(){ val fileOutputStream = openFileOutput("list.dat", Context.MODE_PRIVATE) val objectOutputStream = ObjectOutputStream(fileOutputStream) objectOutputStream.writeObject(adapter.list) objectOutputStream.close() fileOutputStream.close() } -
Add a corresponding method to load the list from File as follows:
private fun loadList(){ try { val fileInputStream = openFileInput("list.dat") val objectInputStream = ObjectInputStream(fileInputStream) @Suppress("UNCHECKED_CAST") val list = objectInputStream.readObject() as? MutableList<ShoppingListItem> if (list != null) { adapter.list = list } objectInputStream.close() fileInputStream.close() } catch (e: java.io.FileNotFoundException){ //loading has failed, probably first run Toast.makeText(this,"No existing list found",Toast.LENGTH_LONG).show() } } - Add a call to
loadList()in the onCreate method - Run the application and verify that the message appears saying no existing list is found
- Override the
onSaveInstanceStatemethod and add a call tosaveList - Additionally, override
onPauseand do the same - Run the app, verify the message still appears. Add a new item to the list
- Terminate the app via the app switcher in Android
- Relaunch the app, verify that the newly added product persists
- Finally, modify the RecyclerAdapter, so the Bread and Cheese items are not automatically added
- Run the app, remove the bread and cheese, add some new items, and then terminate it using the app switcher
- Relaunch the app and ensure that it behaves as expected
Bug fixing - a recyling problem
You may have discovered that after you remove items that have strikethrough, as other items move up the list, they change to having strikethrough also. If you created a long enough list, you may also have discovered items being struck through erroneously. This is because the views are being recycled. To fix this we need to override the onViewRecycled method and ensure that the strikethrough is toggled off. To do this override the onViewRecycled method as follows:
override fun onViewRecycled(holder: ViewHolder) {
    super.onViewRecycled(holder)
    holder.binding.tvProduct.toggleStrikeThrough(false)
    holder.binding.tvCount.toggleStrikeThrough(false)
}
Retest the application - hopefully it should behave as expected now
A completed version of this project can be found on GitHub
Further tasks
- When rearranging items in the list, when the app is restarted, the new order does not persist. Fix this bug
- Improve the code that handles removing 'found' items from the list so it uses
notifyItemRemoved()instead ofnotifyDataSetChanged() - Implement swipe (left only) to delete individual items on the list
- Modify
onBindViewHolderso overridingonViewRecycledis not neccessary