Lights Out
This tutorial will help you build a version of the game Lights-Out. The games premise is fairly simple: given a series of lights, some of which are illuminated, others not, turn of all the lights. The challenge comes because whilst tapping a light turns it off (or on), the tap also toggles the 'lit' status of each button directly above, below, left and right of the button tapped.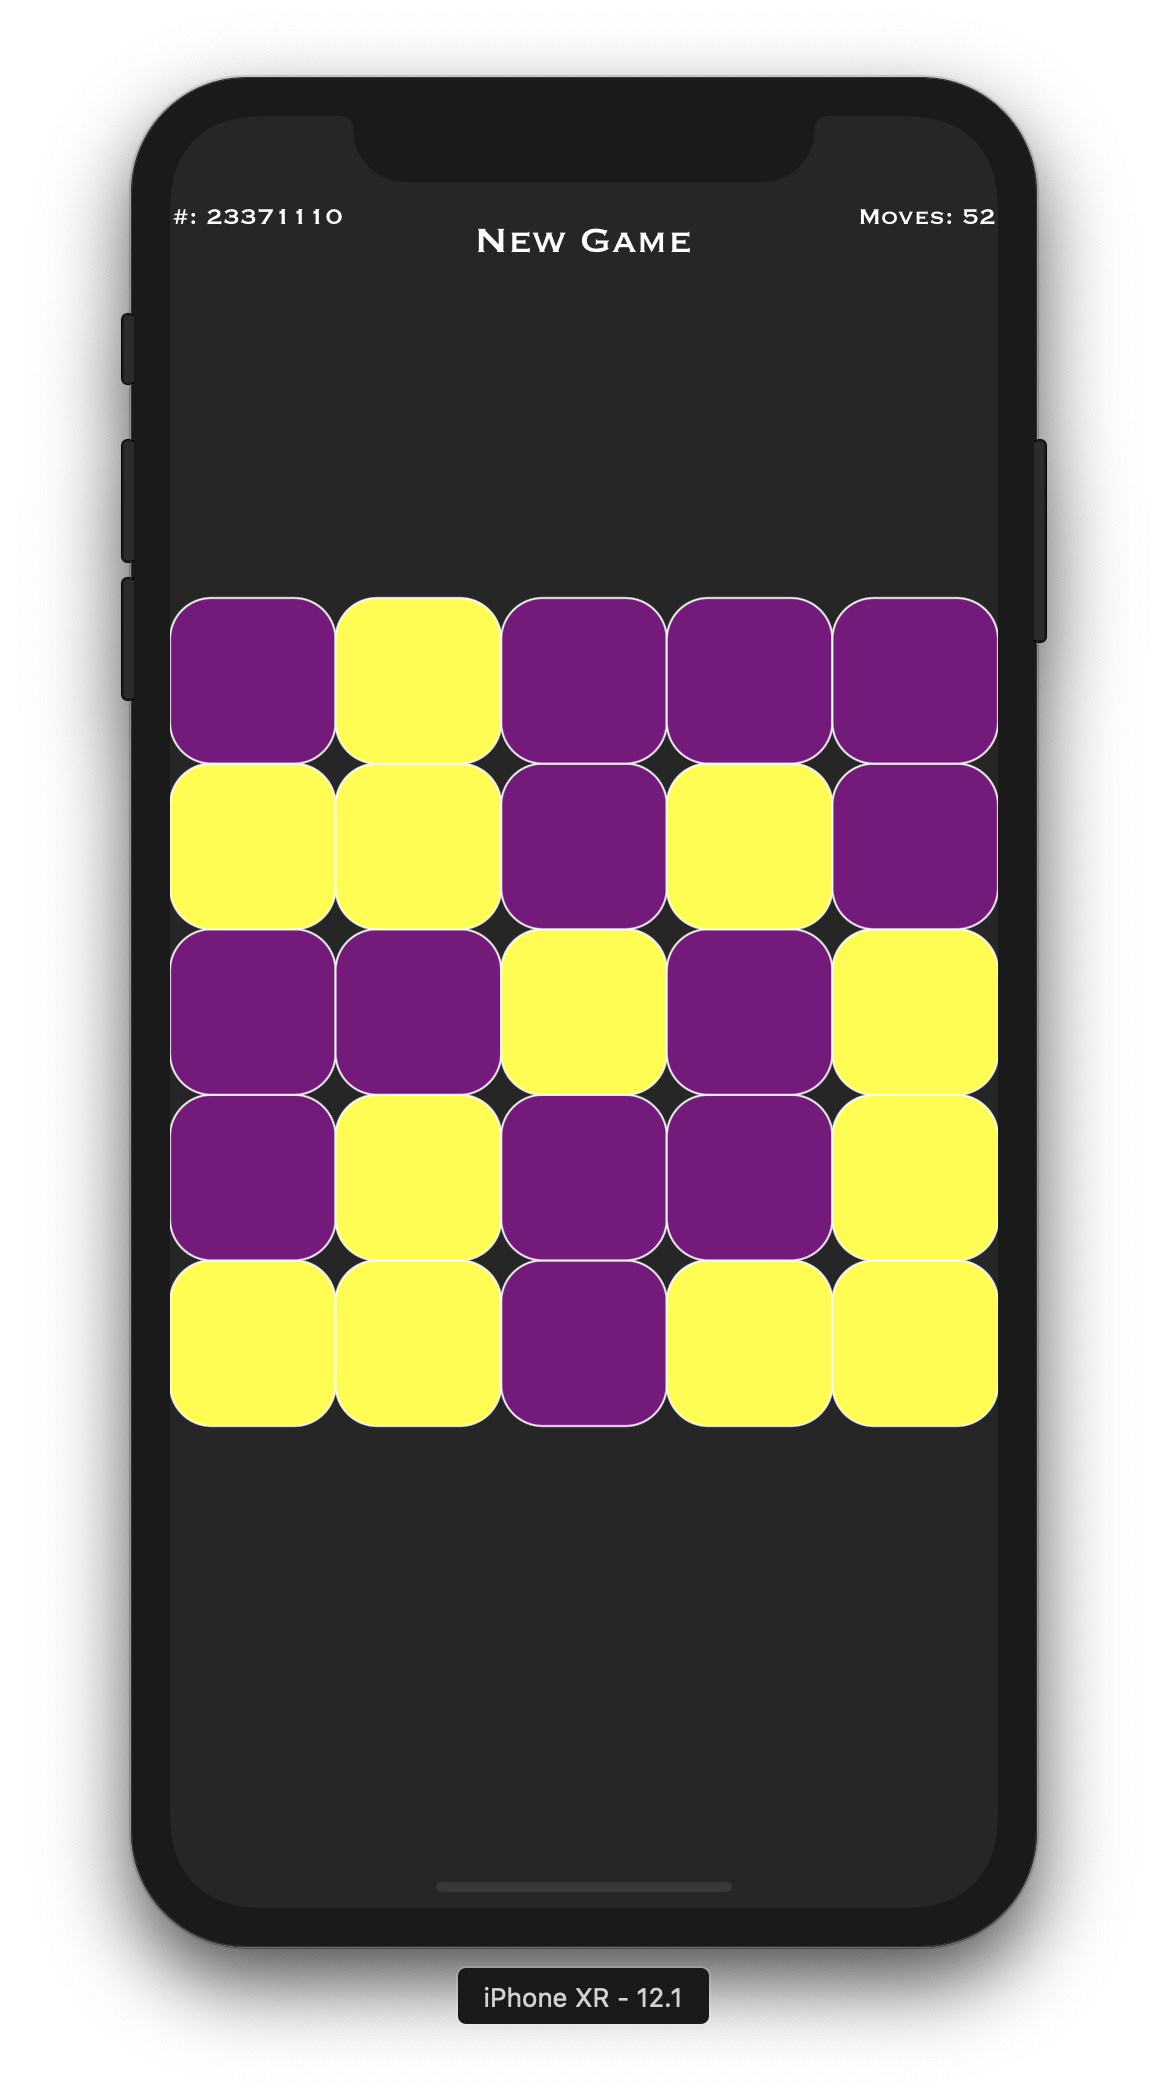
Creating a Project and Game Scene
- Start by creating a new iOS app in Xcode. Although we will create a SpriteKit game, the game template provides a lot of assets we don't need. Instead, start with a Single View iOS application. Name it 'Lights Out' or similar
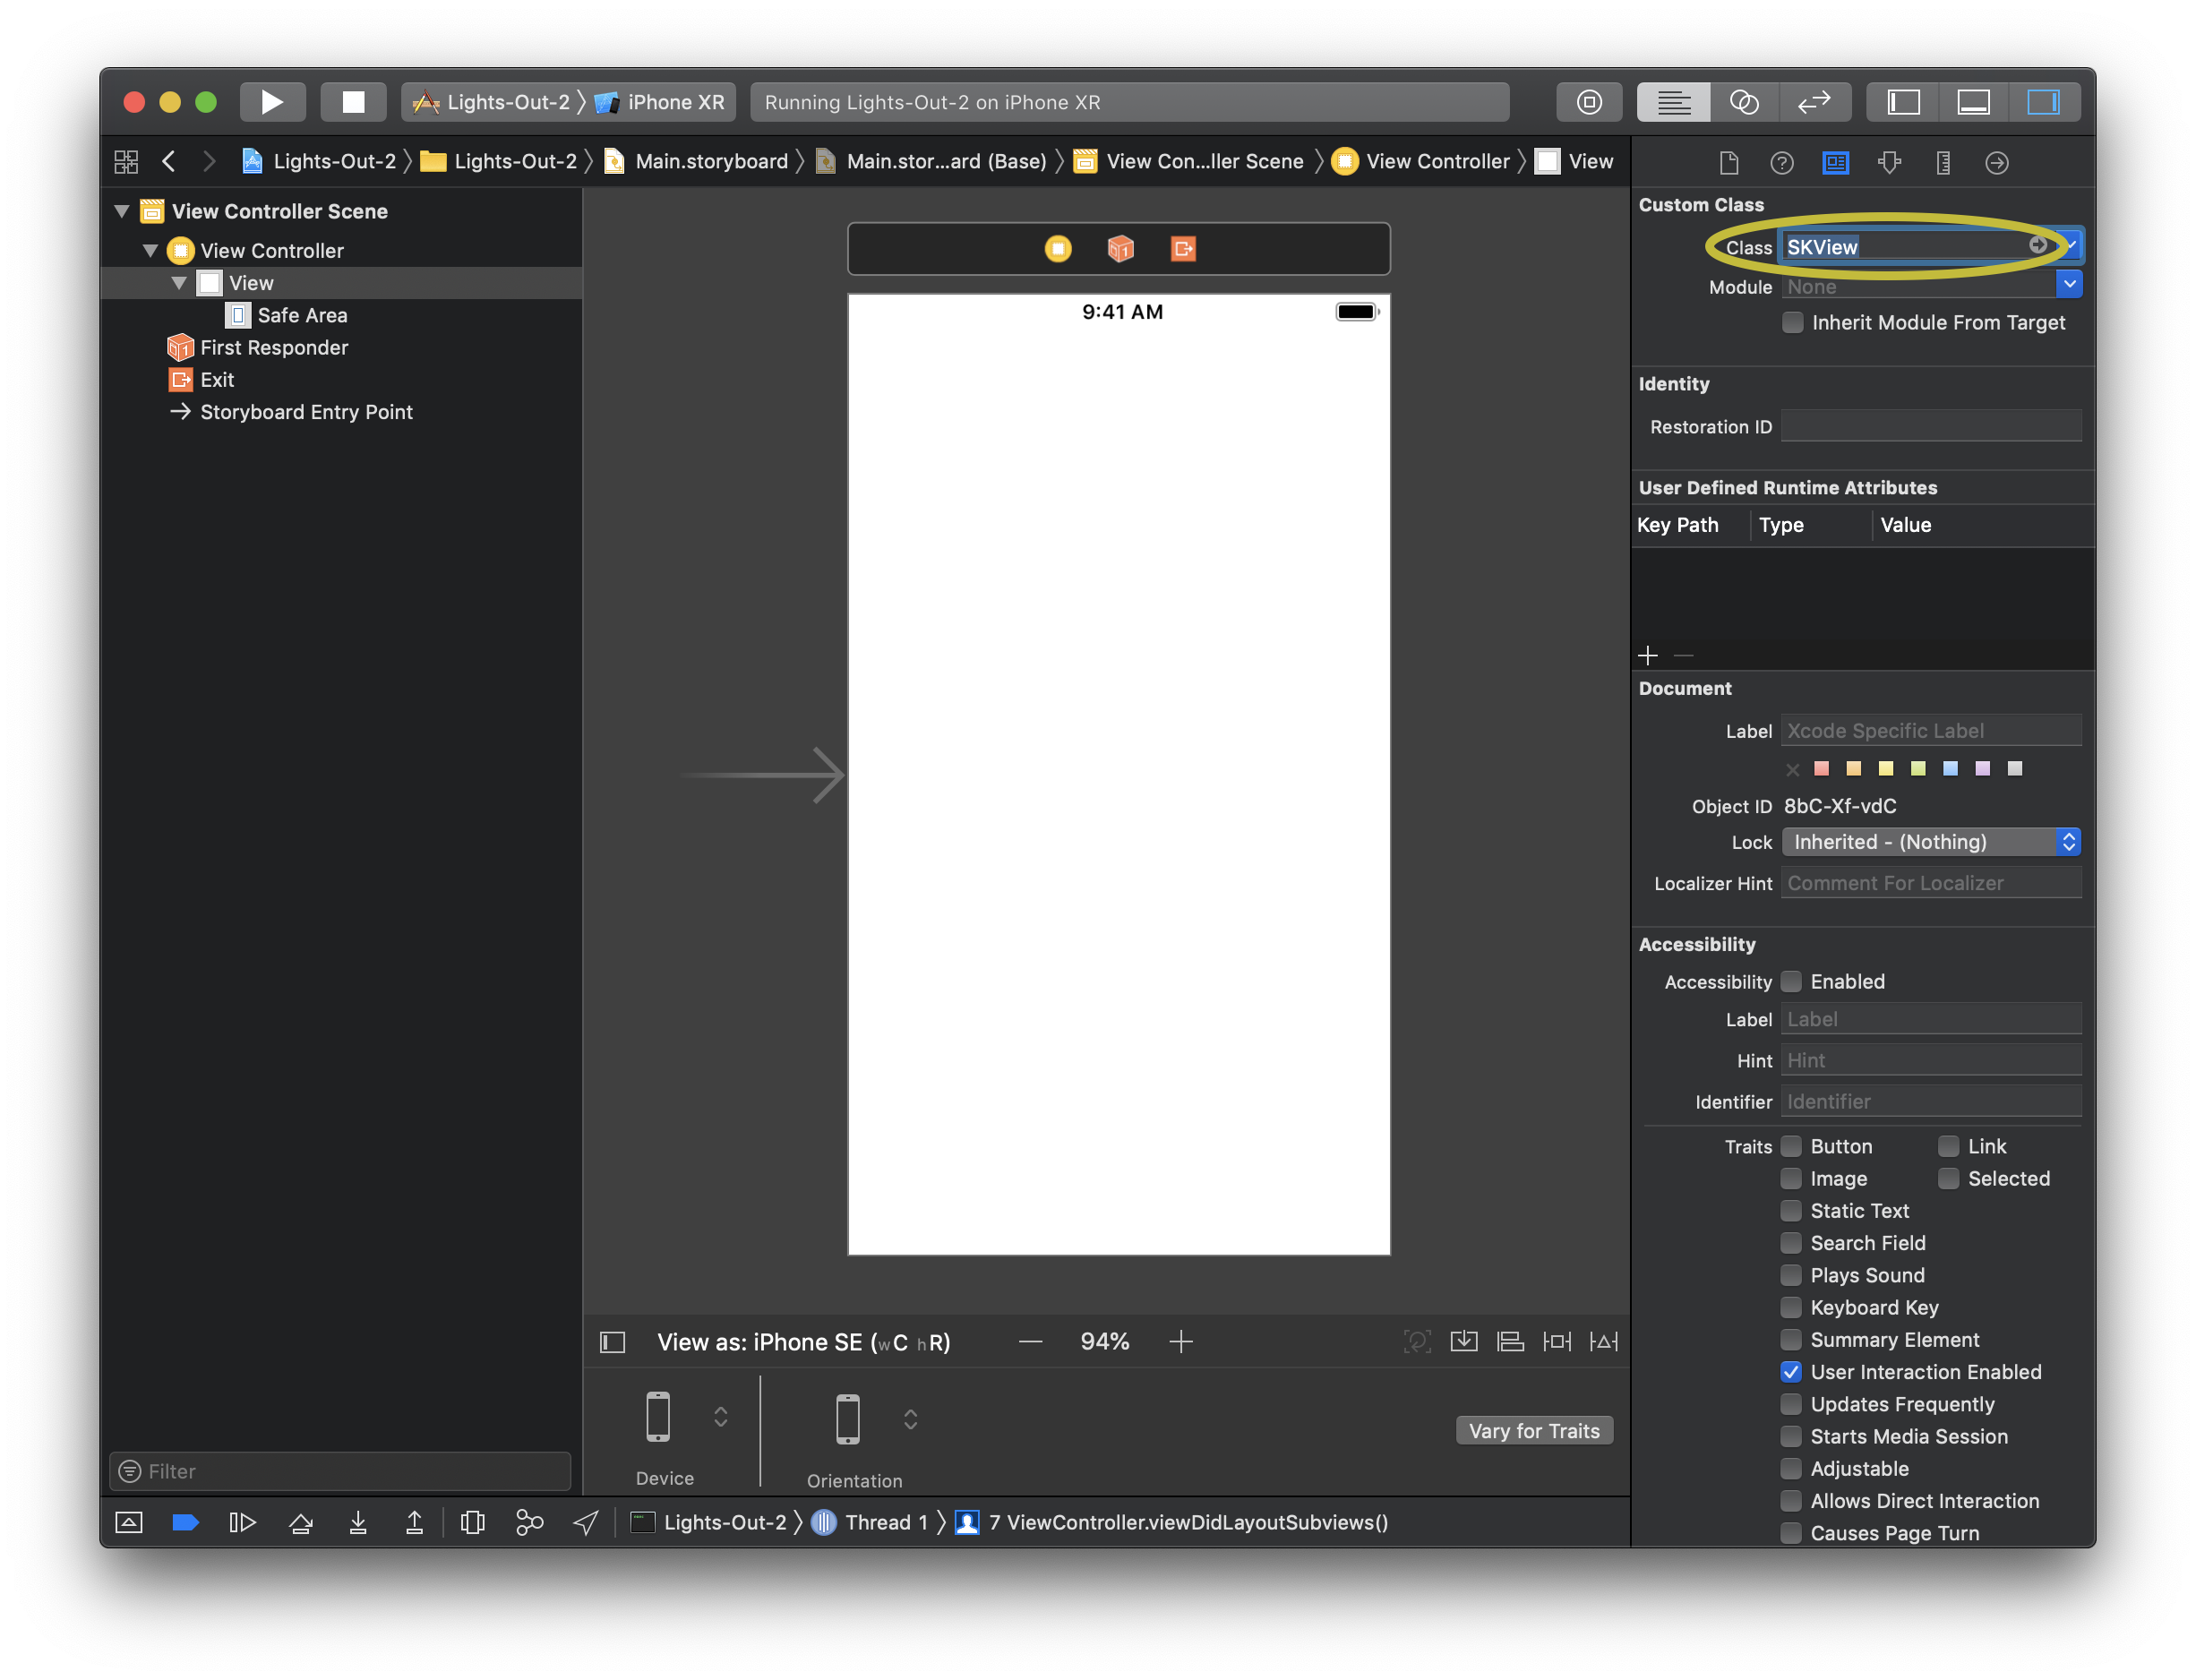
- Click on the Main.storyboard file and select the middle of the white view that appears
-
Using the Identity inspector (you can use the keyboard shortcut ⌘⌥3 to open it) on the right hand side, change the class of the view to SKView as shown here:
- Right (or control click) on the name of the project in the top left corner and choose 'New - File'
- On the next screen, choose Cocoa Touch class and click 'Next'
- On the next Screen Name the Class "GameScene" and set the 'usbclass of' dropdown to say SKScene (you can type this in)
- Save the file in the project as prompted and click 'Create'
- At the top of the new file change the line that starts
importto read as follows:import SpriteKit - Add the following line of between the braces in the file:
var topInset = CGFloat(0) //will be used to offset labels on devices with notch
Configuring the view controller
- Open the ViewController.swift file. This file is what controls what appears on the screen. We need to tell it to do a few things.
- Firstly add the following code immediately under the class declaration (the line that starts
class)var gameScene : GameScene! - Next add a statement under the existing
importstatement as follows:import SpriteKit - Next we want the view controller to load the Game Scene we just added. Because some iPhones have a notch, we need to inform the game scene of the size of the notch, so it can avoid placing anything in that area, however we don't know the size of the notch until the view lays out its contents. Add the following method below the closing brace of the method called
viewDidLoadthat is provided (i.e. in the class but outside any other method):override func viewDidLayoutSubviews() { //create the game scene and configure it a bit gameScene = GameScene(size: view.bounds.size) gameScene.scaleMode = .resizeFill gameScene.anchorPoint = CGPoint(x: 0.5, y: 0.5) gameScene.topInset = view.safeAreaInsets.top //accounts for notch. This is 0 in viewDidLoad(), so have to move here //get the view from this view controller, cast it as a SKView and present the scene let skView = self.view as! SKView skView.presentScene(gameScene) } - Finally add the following method below the one you just added (but before the final closing brace) to ensure the game only runs in portrait:
override var shouldAutorotate: Bool {
        return false
    }

    override var supportedInterfaceOrientations: UIInterfaceOrientationMask {
        return .portrait
    }

    override var prefersStatusBarHidden: Bool {
        return true
    }
The view controller is now complete - so it's time to start writing the logic for the game
A light
On of the key elements of the game is a light that can be toggled on and off, and which will also be able to notify the game that it has been tapped. We will create a class to do this.
- Add another class (like you did for GameScene) but call it LightNode, and make it a subclass of SKShapeNode
- Change the import statement to import SpriteKit (not UIKIt)
- We will want to create our own initiliser (like a constructor) for this class, but in order to do so, we have to override an initialiser from the parent class, and also implement a required initialiser. To do this, add the following code to the LightNode class:
//designated initialzer, so we must override it override init(){ super.init() } //required initializer, must implement (even though it wont be used) required init?(coder aDecoder: NSCoder) { fatalError("init(coder:) has not been implemented") } - Later we will want to know if a LightNode is lit, and also it's position in the grid, so add the following properties:
private (set) var lit = false private var index : Int? - We will also want to be able to toggle the light (in practise the colour of the node, so add the following method to do that:
func toggle(){ lit.toggle() fillColor = lit ? UIColor.yellow : UIColor.purple } - Another thing we need to do, is to notify the GameScene when the LightNode is tapped, rather than store a reference to the GameScene inside the LightNode (which would make it less resuable, for example in a different game which also had light), we can create a protocol which the GameScene (or any other scene) can adopt, and store a reference to anything that adopts that protocol. Within the LightNode file, but not inside the LightNode class, add the following protocol declaration:
protocol LightDelegate { func lightPressed(id: Int) } - Next, back inside the ShapeNode class, add a property as follows:
private var delegate : LightDelegate? - Now add another init method (the one we will use), as follows:
init(rect: CGRect, cornerRadius: CGFloat, index: Int, delegate: LightDelegate){ //call parent class initialisers super.init() self.init(rect: rect, cornerRadius: cornerRadius) //configure the node isUserInteractionEnabled = true //ensures that the node can handle touch events fillColor = UIColor.purple self.index = index self.delegate = delegate } - Finally, override the following method to react to touch events:
Notice how this informs the delegate (in this project it will be the GameScene) that it has been pressed. Because lots of LightNode objects exist, the index allows it to be differentiatedoverride func touchesBegan(_ touches: Set<UITouch>, with event: UIEvent?) { if let actualIndex = index { delegate?.lightPressed(id: actualIndex) } }
The Light node class is now completed. All that remains is to write the logic for the game!
Game logic
- Open the GameScene file you added earlier
- Add the following properties:
private var buttons : Array<LightNode>! private var moves = 0 //counts the number of moves the player makes private var newGameLabel : SKLabelNode! //displays 'new game' on screen and will be tappable private var movesLabel : SKLabelNode? //displays the number of moves private var gameNumberLabel : SKLabelNode? //displays a unique number to represent the game being played, based on the light pattern at the start - The various labels will need some setting up, so add the following methods to do that:
private func addNewGameLabel(){ newGameLabel = SKLabelNode(text: "New Game") newGameLabel.fontName = "Copperplate" newGameLabel.fontColor = SKColor.white newGameLabel.fontSize = 22.0 newGameLabel.position = CGPoint(x: 0, y: (frame.size.height/2)-(newGameLabel.frame.height+topInset + 10)) addChild(newGameLabel) } private func updateMovesLabel(){ if movesLabel != nil { movesLabel!.removeFromParent() } movesLabel = SKLabelNode(text: "Moves: \(moves)") movesLabel!.fontName = "Copperplate" movesLabel!.fontColor = SKColor.white movesLabel!.fontSize = 14.0 movesLabel!.position = CGPoint(x: frame.width/2 - (movesLabel!.frame.width/2), y: (frame.size.height/2) - (movesLabel!.frame.height+topInset)) addChild(movesLabel!) } private func gameNumberLabel(number: UInt32){ if gameNumberLabel != nil { gameNumberLabel!.removeFromParent() } gameNumberLabel = SKLabelNode(text: "#: \(number)") gameNumberLabel!.fontName = "Copperplate" gameNumberLabel!.fontColor = SKColor.white gameNumberLabel!.fontSize = 14.0 gameNumberLabel!.position = CGPoint(x:gameNumberLabel!.frame.width/2 - frame.width/2, y: (frame.size.height/2) - (gameNumberLabel!.frame.height+topInset)) addChild(gameNumberLabel!) } - Before we draw the board of lights, the class needs to implement the protocol we defined earlier, and it also needs to declare that it does. Modify the class declaration as follows:
class GameScene: SKScene, LightDelegate { - An error will appear (wait a few seconds if needs be), click the error and choose the fix option, which will add a method to match the one we declared when we created the protocol
- Delete the placeholder inside the newly added method (which we will come back to later)
- Next add the following code which will draw a grid of 5 x 5 lights at the centre of the screen. Try and understand how the maths works to both determine the size and position of the buttons (bearing in mind they will differ depending on the size of the device):
private func drawLightBoard(){ buttons = Array() //centre of canvas is 0,0 let width = min(frame.size.width, frame.size.height) let buttonWidth = width/5 for i in 0...24 { //grid drawn from bottom left let row = CGFloat(i % 5) let col = CGFloat(i / 5); let offset = 0 - width/2 let location = CGRect(x: offset + (buttonWidth * row), y: offset + (buttonWidth * col), width: buttonWidth, height: buttonWidth) let lightNode = LightNode(rect: location, cornerRadius: buttonWidth/4, index:i, delegate: self) //animate the buttons by fading them into view lightNode.alpha = 0 let animation = SKAction.fadeIn(withDuration: 2.0) lightNode.run(animation) //add to screen and also add references the array addChild(lightNode) buttons.append(lightNode) } } - The next stage is to be able to randomise the lights, however, rather than randomising each light (which could leave us with a pattern that cannot be solved), we will randomly toggle the same pattern of lights that the user could - thus pressing those same lights again would solve the game. Firstly add a method which can toggle a light and the apporpriate adjacent ones as follows:
Again, try and understand how the maths allows us to determine the index of the buttons adjacent to the one being pressedprivate func togglePattern(id: Int){ //this light buttons[id].toggle() //below if id >= 5 { buttons[id-5].toggle() } //left if id % 5 > 0 { buttons[id-1].toggle() } //right if id % 5 < 4 { buttons[id+1].toggle() } //above if id < 20 { buttons[id+5].toggle() } } - Next add the following method which will turn each light (and its associated ones) on and off randomly, and generate a corresponding game number in the process:
private func randomLights() -> UInt32 { var gameNumber : UInt32 = 0 for i in 0...24 { gameNumber <<= 1 // (e.g. 00001100 becomes 00011000) if Bool.random() { //use arc4random_uniform(2) == 1 for Swift 4.1 and earlier togglePattern(id: i) //ensure that the game can be won, as each press toggles the same lights the player does gameNumber += 1 //print(i) //uncomment this to see which lights to turn off to win the game } } return gameNumber } - At the end of the game, to make the game more appealing, we will animate the buttons away by dropping them off the screen. Because SpriteKit provides a physics engine, this is nice and easy, we simply attach a physics body to each button and let the physics engines gravity do the rest - we just need to make sure that the buttons cant collide with each other so they don't bounce around. We'll also do it randomly and introduce a delay between each one for effect. Add a methods as follows to do that:
Note how the code above builds the sequence inside the loop, but then executes it after the loop is complete, this enables the delay between each animation.private func dropButtons(){ var sequence = [SKAction]() while !buttons.isEmpty { let button = buttons.randomElement()! button.isUserInteractionEnabled = false //prevent user tapping old button and triggering action buttons.remove(at: buttons.firstIndex(of: button)!) let delay = SKAction.wait(forDuration: 0.03) let dropButton = SKAction.run { button.physicsBody = SKPhysicsBody(rectangleOf: button.frame.size) button.physicsBody?.collisionBitMask = 0 // do not collide with anything } sequence.append(dropButton) sequence.append(delay) } run(SKAction.sequence(sequence)) } - We also need to be able to determine if the game is over, add this method to do just that:
private func completed() -> Bool{ for button in buttons { if button.lit { return false } } return true } - Next add a method which will call some of the methods we've just added to start the game as follows:
private func newGame(){ drawLightBoard() let gameNumber = randomLights() gameNumberLabel(number: gameNumber) moves = 0 updateMovesLabel() } - We want to call the above method when the scene loads, so implement the following method:
override func didMove(to view: SKView) { newGame() addNewGameLabel() } - Also add a method which will enable us to update the number of moves (both the counter and the label) as follows:
private func incrementMovesCount() { moves += 1 updateMovesLabel() } - At this point you should be able to run the game and see a board, but you won't be able to play - we still need to add logic to the delegate method we added earlier. Locate the empty
lightPressed(id: Int)method and add the following code:
You should now be able to play the game, but you will not be able to start a new one, even if you completed itincrementMovesCount() togglePattern(id: id) if completed() { dropButtons() } - Implement this final method which will allow a tap on the new game label to start a new game:
override func touchesBegan(_ touches: Set<UITouch>, with event: UIEvent?) { if newGameLabel.frame.contains(touches.first!.location(in: self)) { newGameLabel.isUserInteractionEnabled = true //no action associated so essentially disables the button dropButtons() let delay = SKAction.wait(forDuration: 1.0) let newGame = SKAction.run { self.newGame() } let reEnableNewGameButton = SKAction.run { self.newGameLabel.isUserInteractionEnabled = false } let sequence = SKAction.sequence([delay,newGame,reEnableNewGameButton]) run(sequence) } } - Play the game and have fun
A completed version of the game can be downloaded from GitHub
Further tasks
- Vary the light pattern for the game
- Allow the user to select from some pre-determined patterns
- Allow the user to create their own patterns
- Implement some form of scoring system