Testing Methods with Unit Tests
This tutorial has been updated for JUnit 5, you can find the old tutorial for JUnit 4 here
One of the key components of writing good software is to ensure that our code is tested. Clearly we can test our applications by running them and checking that we receive the expected response, but in anything but the simplest of apps, some errors can be hard to track - particularly if they do not cause the application to crash. Consider the following code
package uk.ac.chester;

import java.util.Scanner;

public class Main {

    public static void main(String[] args) {
        Scanner inputScanner = new Scanner(System.in);
        System.out.println("Please enter a phrase:");
        String line = inputScanner.nextLine();
        char letter = line.charAt(0);
        char upperLetter = convertToUpperCase(letter);
        System.out.println(upperLetter);
    }

    public static char convertToUpperCase(char letter) {
        String letterAsString = String.valueOf(letter);
        letterAsString = letterAsString.toUpperCase();
        char upperLetter = letterAsString.charAt(0);
        return upperLetter;
    }

}convertToUpperCase() method we are required to write correct code to use the Scanner, get a string, get a character in a string and then print the output. Even if we wrote code to create the char and modified it to test multiple letters it is still an unwieldy way to test things. Consider if it was part of a large programme, where we couldn't just modify the programmes core functionality to test the one method, it would be very hard to check that the method works correctly.
A solution to this problem is to write code which has the sole purpose of testing a method. The next steps walk you through the process of creating a unit test for the convertToUpperCase method
- Create a command line project in IntelliJ IDEA with the code shown above
-
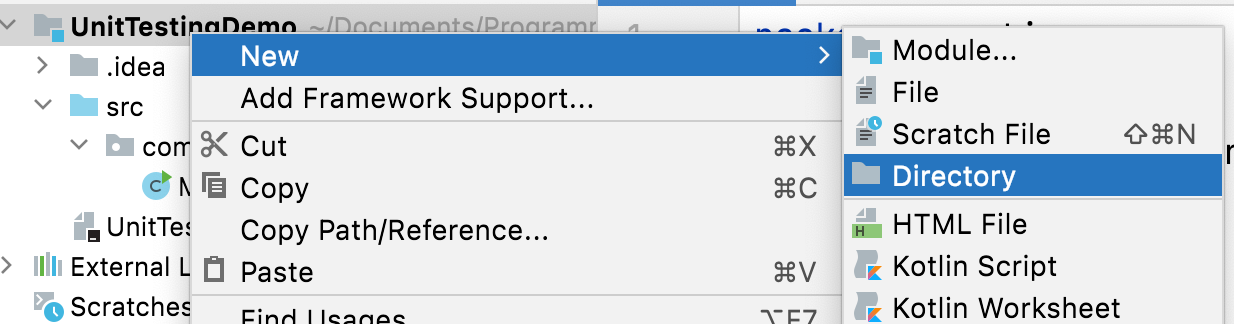
Add a new folder to the root of the project called 'tests'. This allows us to keep our tests separate from our existing code
 "
"
-
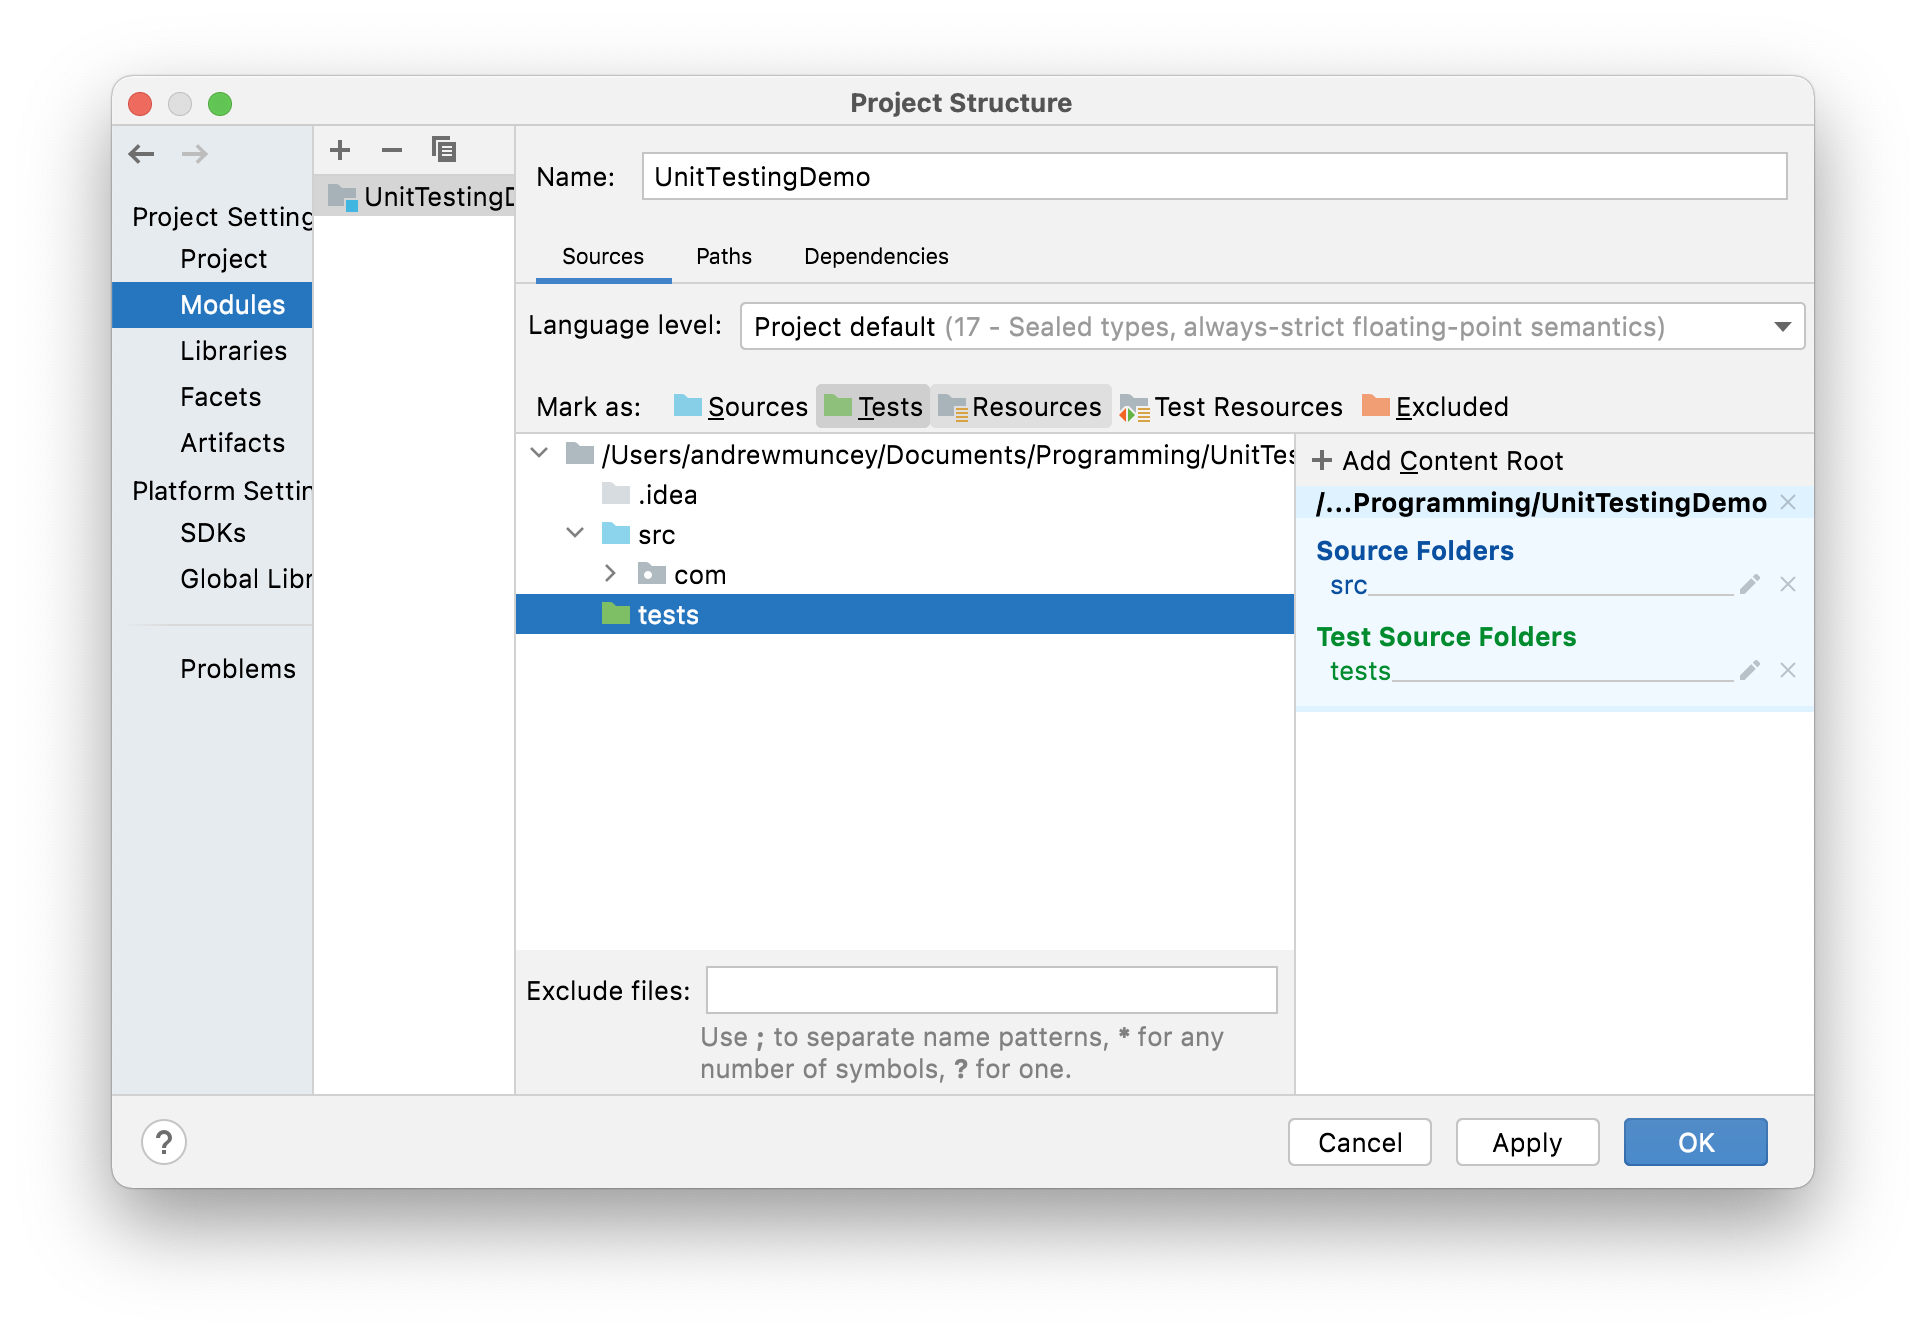
On the menu bar, click 'File' and then 'Project Structure'. Select 'Modules' on the left hand side of the dialogue box that appears and select the newly added 'tests' folder. Click the green 'Tests' button above the folder tree, which will inform IntelliJ IDEA that the folder will be used for tests.
- Returnt to the code and place the cursor in the name of the method we want to test (
convertToUpperCase), selecting 'Navigate' on the menu and choosing 'test'. Then choose the 'create test' option. Alternatively you can right click and choose 'Generate' and 'Test', or press ⇧⌘T (Ctrl + Shift + T on Windows) -
In the screen that appears:
- Set the testing library to JUnit5
- Click the 'Fix' button and in the dialogue box that appears press OK
- Check the checkbox for creating a unit test for the
convertToUpperCase()method
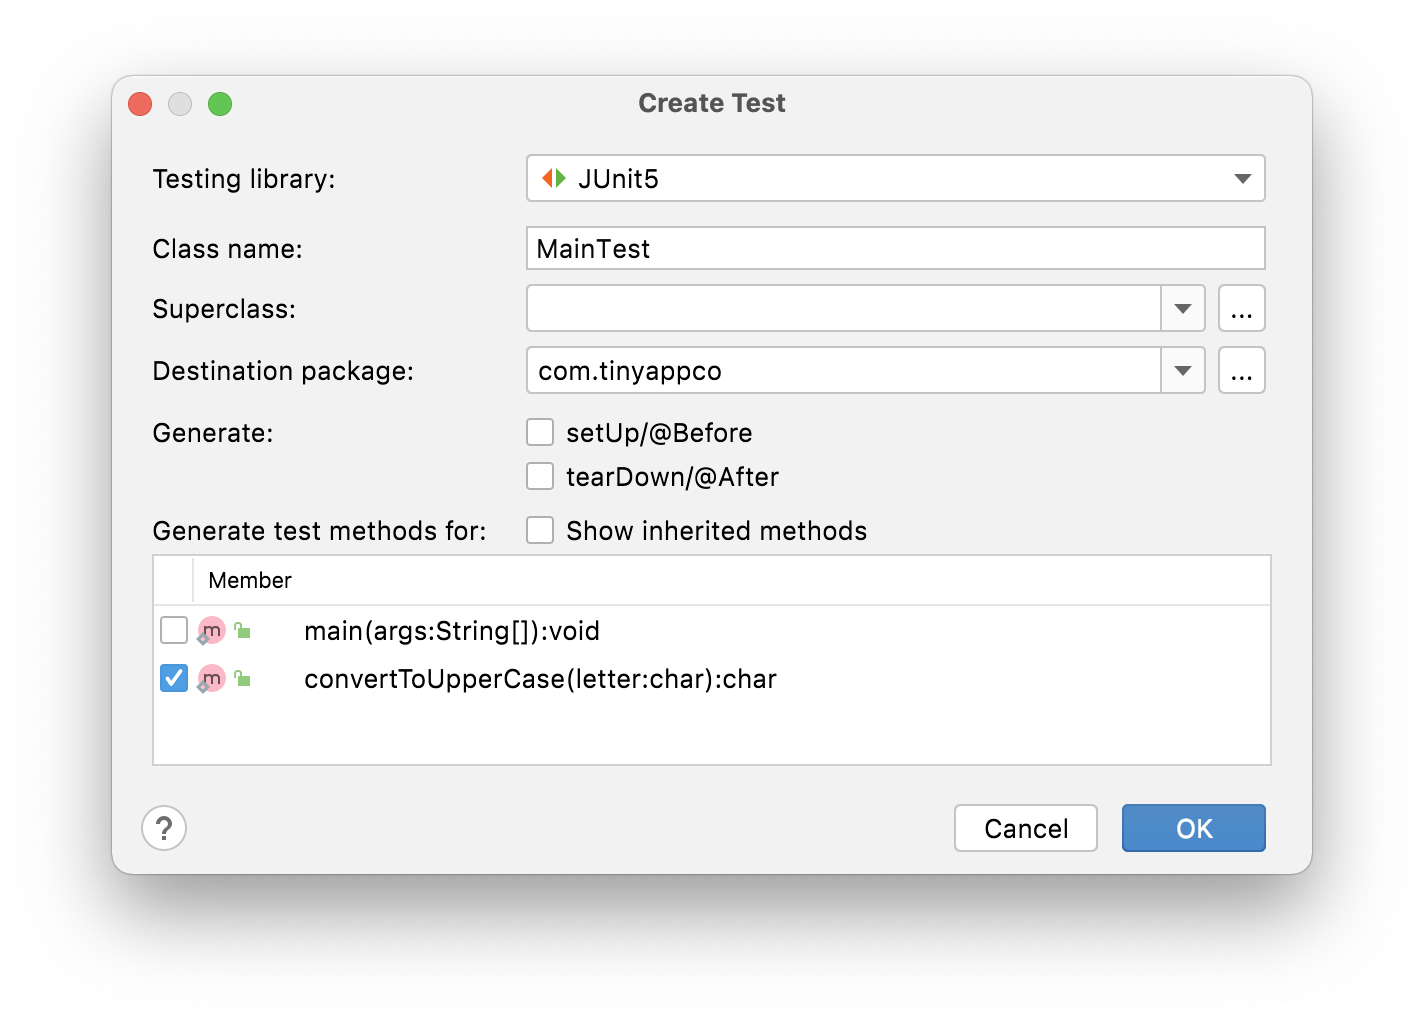 Click OK and a file will be created called MainTest, which will look similar to that shown below:
package com.tinyappco;

import org.junit.jupiter.api.Test;

import static org.junit.jupiter.api.Assertions.*;

class MainTest
{

    @Test
    void convertToUpperCase()
    {
    }
}
The method that is created is designated as a testing method by the
@TestcodeYou may also notice that the method is inside a new class called
MainTestthis convention indicates that methods here will test the corresponding methods in the Main class -
The next stage is to write some code to test the method, we do this using a special class called 'Assertions', which allows us to check various things, such as if values are equal, or if a value is true. The methods in the assertions class are available to us to use without having to specify the name of the class, because they are automatically imported by the second import statement in the code above. Modify the methods as shown below:
The changes made are as follows:package com.tinyappco; import org.junit.jupiter.api.Test; import static org.junit.jupiter.api.Assertions.*; public class MainTest { @Test public void convertToUpperCase(){ char resultWithA = Main.convertToUpperCase('a'); assertEquals('A', resultWithA); } }- A line of code calls the
convertToUpperCase()method in the Main class with the lowercase letter 'a' as the parameter and stores the result as a char - A line of code asserts that the expected value (a capital 'A') is equal to that actual value returned by the method.
- A line of code calls the
-
To run the test, click the play button in the gray bar to the left of the method code
 :
:
-
To the bottom of the screen you should see output similar to that shown below, indicating that the test has passed successfully as follows
 Verify this is as expected, if not check that your code is written accurately.
- In IntelliJ, go back to the Main class, comment out the existing code in the covertToUpperCase method and add a new statement to return just an uppercase 'A' as follows:
public static char convertToUpperCase(char letter) { // String letterAsString = String.valueOf(letter); // letterAsString = letterAsString.toUpperCase(); // char upperLetter = letterAsString.charAt(0); // return upperLetter; return 'A'; } - Return to the test and run it. You should see it pass, despite the fact we have modified the code so it is clearly incorrect.
- As the test is clearly unsatisfactory, add another method to check a different letter as follows
char resultWithF = Main.convertToUpperCase('f'); assertEquals('F', resultWithF); -
Run the test again, and the new assertion should fail, with error output similar to that shown below:
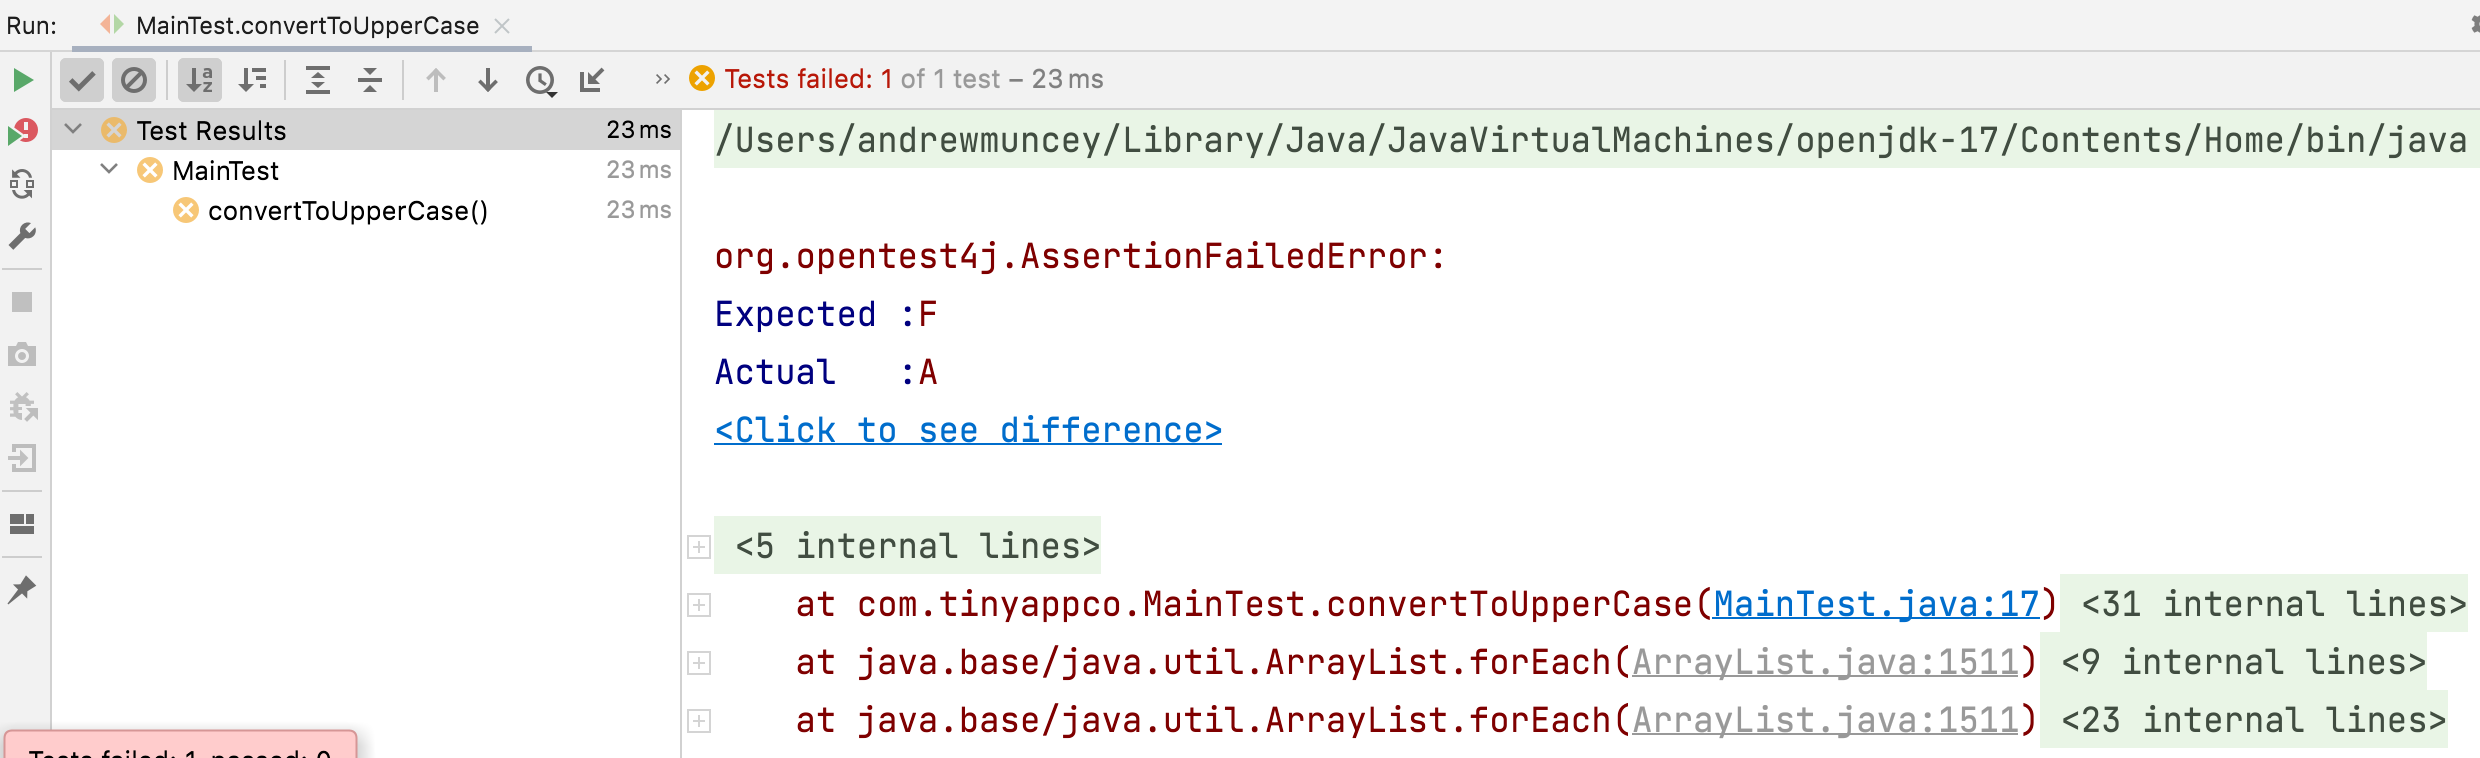 Note that the stack trace shows the line number in the test method, enabling us to identify which assertion is failing. We can also see actual and expected results in the output.
- Go back to the main class and undo the changes you made earlier.
- Re-run the test and confirm it passes
- At this stage, we have only written code to check conversion of lowercase letters to upper, and for greater assurance that our code will behave as intended, we need to consider a wider range of possible inputs and expected outputs, for example if an uppercase 'C' is passed into the method we would expect that it remains as an uppercase 'C', if a number '4' character is used we would expect that to be unchanged, and if a lowercase 'ü' is passed in, it should retain its umlaut following conversion. Add methods as follows to do that:
char resultWithUpperC = Main.convertToUpperCase('C'); assertEquals('C', resultWithUpperC); char resultWith4 = Main.convertToUpperCase('4'); assertEquals('4', resultWith4); char resultWithUmlautU = Main.convertToUpperCase('ü'); assertEquals('Ü', resultWithUmlautU); - Verify the tests pass correctly
The process of writing tests requires a judgement call to be made my the developer. What are the likely errors to guard against in any given method, and how much time is required to write the tests. At this stage, writing tests may take a long time, for little perceivable gain, however as you become a more proficient programmer, you will become faster at writing tests, and more able to discern which tests should be written.
A further benefit of writing unit tests is that if you make a change to a method (for example you refactor it), it is very quick to re-run the tests to check you haven't broken it!
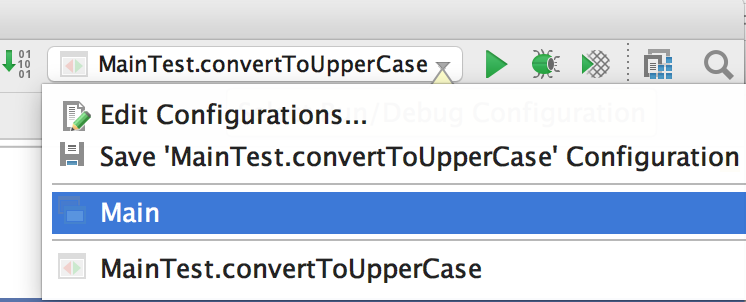
Switching between running tests and running the programme
At the top right hand corner of IntelliJ IDEA is a dropdown list - this shows both the test application and the main application - use the drop down to switch between them so the 'play' button will run the desired application. Ignore the edit and save options for now.
Task
- Add the following code to the Main class of the above project:
public static String makeTitleCase(String phrase) { String result = ""; boolean startOfWord = true; for (int i = 0; i < phrase.length(); i++) { char letter = phrase.charAt(i); if (letter == ' ') { startOfWord = true; } else { if (startOfWord) { letter = convertToUpperCase(letter); startOfWord = false; } } result += letter; } return result; } - Modify the code in the main method to request text from the user, then call the
makeTitleCasemethod (with that text) and finally print the result to the screen. Verify that typing 'hello world' (without the quotes) results in 'Hello World' being printed. - Add a unit test for this method
- Add assertions in the unit test until you find the bug in the code (for the avoidance of doubt, the behaviour of this method should be the same as Microsoft Word's Change case -> Title Case feature. This feature is also labelled as 'Capitalize Each Word' in some versions of Word)
- Fix the bug in the code (If you write a new method to do this, it will also need its own unit test).
- Check all the unit tests pass
Advanced task
Revisit previous tasks you have completed. Write unit tests to verify the methods in them. Where all the code is in the main method, extract methods as appropriate before writing the unit tests.