Form Views
This tutorial requires you to download the FormViews starter project. The project already has some functionality - it displays a list of books in a GridView on the home page and certain other pages.
A FormView for Inserting
As GridViews cannot add new records to the database, the first stage is to add functionality to do just that.
- Open the Admin/Add.aspx page
- Add a FormView to the page, and configure it with a new data source. The project has a SQL Database file containing sample records in the App data folder, and you can connect to this using the existing BooksConnectionString when prompted
- Ensure you configure the data source to generate Insert, Update and Delete statements in the 'Advanced' dialogue box
- Change the FormView's DefaultMode property to 'Insert'
- Run the page, and add a new book using the FormView (make up the details, but ensure the title and publishers are no more than 50 characters each, the author(s) no more than 250 characters and the ISBN is 13 numbers)
- Return to the home page and check that the newly added book appears in list (note it is Alphabetical by title, so it may not be at the bottom)
-
Whilst the FormView is now functional, it is neither particularly accessible, nor is it robust against users inserting data in the wrong format
- Modify the FormView so that is accessible using the Fixing the FormView tutorial
- Add appropriate Validation to the fields (Revisit the Validation tutorial if you are a little rusty)
A FormView displaying data from a GridView's selected row
- Go to the Staff page (Staff/Default.aspx)
- In the pop out menu for the GridView, Enable Selection
- Add a new FormView to the page beneath the GridView.
- Add a new data source for the FormView, and on the "Configure the Select statement" page click the WHERE and configure it to use the selected value from the GridView, as show below
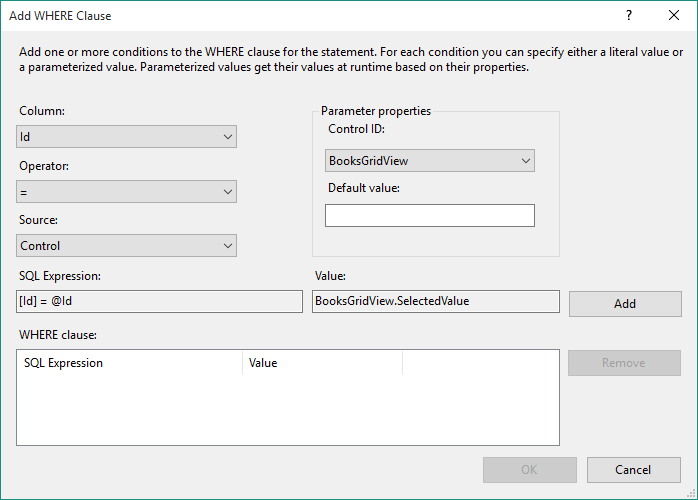 Be sure to click the "Add" button before clicking OK
 - Ensure default mode for the FormView is ReadOnly and test that it works in the browser
- Finally, edit the HTML in the FormView so the markup is clean (for example remove all
<br />tags)
A FormView for displaying data on another page
As some of the information about a book could be quite lengthy (for example the description) it is advisable only to show a basic details and then allow the user to select one and show details of it on another page (typically this might have images and other options such as "Add to wish list" or "Buy now")
- Go to the home page (Default.aspx)
- In the pop out menu for the GridView, choose Edit Columns
- From the Available Fields listbox, double click on HyperLinkField to add it to the SelectedFields
- Select the hyperlink in the AvailableFields list and configure the following fields, as shown below.
- Text: View Book
- DataNavigateUrlFields: Id
- DataNavigateUrlFormal: ViewBook.aspx?Id={0}
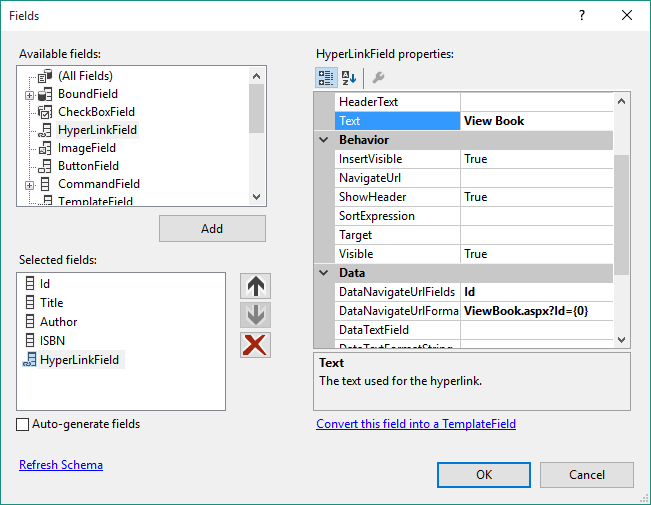 The Text field is what will be displayed to the user, the DataNavigateUrlFields specifies which field we will use from the database and the DataNavigateUrlFormat field specifies the URL that the hyperlink will go to, along with values inserted from the DataNavigateUrlFields, in the form {0}.
 - Run the page and hover over the links - you should see that the URL varies by the id of each book, and clicking it goes to the ViewBook.aspx page, though nothing specific about the book will appear at this stage
- Open the ViewBook.aspx page
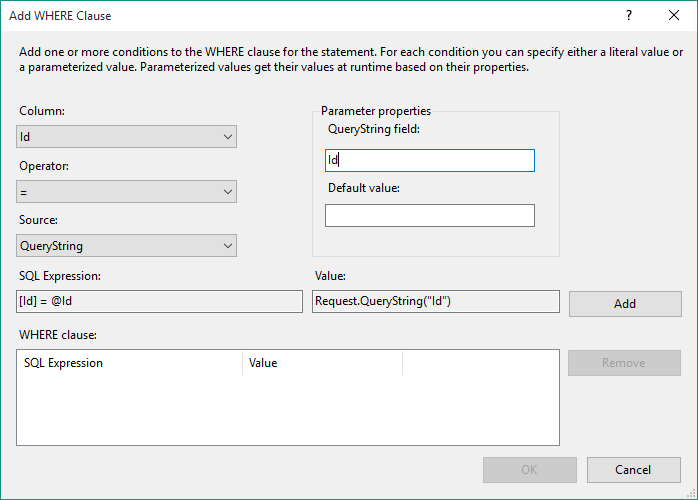
- Add a FormView, and configure it to view data, as before, add a where clause, but this time configure it to use a QueryString as the source and set the querystring field to 'Id' as shown below:
- Go back to the home page, load it in the browser, click a link and ensure that the details relating to the appropriate book are displayed
- Finally, return to the ViewBook.aspx page and edit the HTML in the FormView so the markup is clean (for example remove all
<br />tags)
A FormView for editing data
In the same way that information is sometimes to long to view in a GridView, the same applies to editing.
- Used Admin/Edit.aspx page
- Add a FormView in the same way you did for viewing data, ensuring that Insert, Update and Delete statements are generated (find in the advanced options of the data source configuration dialogue box)
- Set the default FormView mode to "Edit"
- In order to ensure that when the FormView is updated the GridView data is refreshed to show the changes, we need to write some code to execute when the record is updated. View the Events for the FormView, by clicking the lightning bold in the GridView's properties. Then double click in the ItemUpdated event, highlighted below. This will take add an event handler in the .cs file which will be called when a record is updated, and you will be taken to the code.
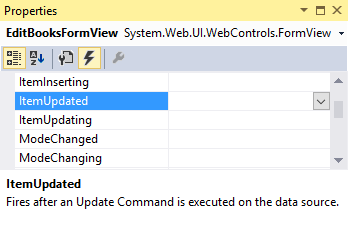
- Add code to the newly created event as shown below:
protected void EditBooksFormView_ItemUpdated(object sender, FormViewUpdatedEventArgs e) { SelectBooksGridView.DataBind(); } - Test that you can edit records and that the GridView updates automatically
- Finally, clean up the FormView's code so it is more accessible and add validation
Advanced
- Reuse the same FormView so that records can be added and edited on the same page. You will need to change the FormView mode programmatically