Apple Watch : Minesweeper
This tutorial will show you how to create a version of the game MineSweeper for Apple Watch in Swift.
Whilst there is a fair bit of logic to the game, this tutorial concentrates on interactions within the interface controller, the game logic is provided 'as is' and should be largely self explanatory.
Creating a new project
Create a new Swift project using the Watch App template, name it 'MineSweeper", set the User Interface option to Storyboard and uncheck all the 'Include' options at the bottom of the screen
Creating the model
Minesweeper relies on any given point (or cell) on the grid being able to know about its neighbours.
- Start by adding a Swift file to the project (using 'File' -> 'New' -> 'File' from the menu). Name the File 'Point' and click 'Next'
- Ensure that the file is added to the 'MineSweeper WatchKitExtension' target before continuing.
- Add the following code to the file:
struct Point : Equatable, Hashable {

    let x: Int
    let y: Int

    init(x: Int, y: Int){
        self.x = x
        self.y = y
    }
}
This creates a structure to represent a point and implementing Hashable (for a struct) also allows two points to be compared for equality with no extra work
The next step is to create another file to handle the representation of the minefield, this will contain a structure to contain information about a certain location on the grid (whether it is a mine and how many mines are adjacent to it). It will also contain much of the logic to create the minefield and check cells
Add another Swift file, named Minesweeper (ensuring you choose the same targets as before) and add the following code to the file (it can be copy and pasted):struct Cell { var isMine = false var adjacentMineCount = 0 } class MineField { private(set) var hasStarted = false private(set) var isExploded = false let mineCount : Int var field = Array<Array<Cell>>() let width: Int let height: Int init(width: Int, height: Int){ self.width = width self.height = height for _ in 0..<height { //create row var row = [Cell]() for _ in 0..<width { row.append(Cell()) } field.append(row) } } func checkMine(_ point: Point) -> Cell{ if !hasStarted{ hasStarted = true determineMinesWithStart(point: point) } let location = field[point.y][point.x] if location.isMine { isExploded = true } var cell = Cell() cell.adjacentMineCount = location.adjacentMineCount cell.isMine = location.isMine return cell } private func determineMinesWithStart(point: Point){ populateMines(mineCount, avoiding: point) populateAdjacentMineCount() } private func populateMines(_ count: Int, avoiding point: Point){ var mineLocations = Set<Point>() repeat { let randPoint = randomPoint() if point != randPoint && !mineLocations.contains(randPoint){ mineLocations.insert(randPoint) } } while mineLocations.count < count for point in mineLocations { field[point.y][point.x].isMine = true } } func mineLocations() -> Set<Point> { var mines = Set<Point>() for y in 0..<field.count { for x in 0..<field[y].count{ if field[y][x].isMine { mines.insert(Point(x: x, y: y)) } } } return mines } private func neighboursFor(_ point: Point) -> Set{ var neighbours = Set<Point>() let minX = max(0,point.x - 1) let maxX = min(width-1,point.x + 1) let minY = max(0, point.y-1) let maxY = min(height-1,point.y+1) for x in minX...maxX { for y in minY...maxY { if !(point.x == x && point.y == y) { neighbours.insert(Point(x: x, y: y)) } } } return neighbours } private func adjacementMineCount(for point: Point) -> Int{ var count = 0 for point in neighboursFor(point) { if field[point.y][point.x].isMine{ count += 1 } } return count } private func populateAdjacentMineCount(){ for y in 0..<field.count { for x in 0..<field[y].count{ field[y][x].adjacentMineCount = adjacementMineCount(for: Point(x: x, y: y)) } } } private func randomPoint() -> Point{ return Point(x: Int.random(in: 0..<width), y: Int.random(in: 0..<height)) } }
Getting it to work with WatchKit
The User Interface
One of the restrictions is that elements cannot be added to scenes programmatically. For a game like minesweeper this is a rather irritating and means for our grid we have to create 25 individual buttons in the scene.
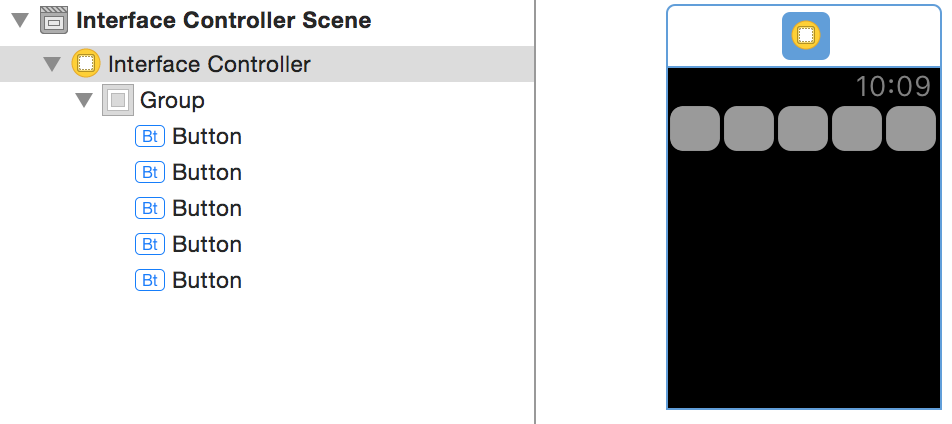
- Start by adding elements to the interface controller so you have a group containing five buttons, each button should be 0.2 of the width of the its group and the group should be 0.15 the height of its container, similar to how the image here shows:
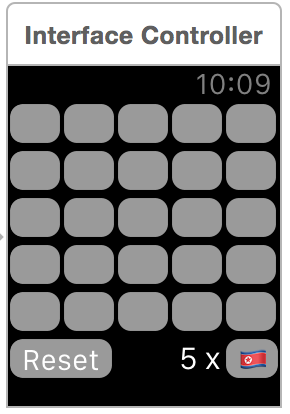
- Repeat the process so you have a grid as shown, along with a button to reset the game, another button to toggle the flag option (hint: use an emoji of a flag as the text for the button title), and a label showing how many flags/mines are remaining as follows:
- Each of the mine locations interface elements need to be connected up to the interface controller as both actions and outlets. Unfortunately we cannot differentiate between the buttons programmatically (there is no 'tag' property as can be found in iOS), so each button will need its own action. Create outlets as follows:
- Connect up the flagButton as an outlet named
flagButton - Connect the 5 x label as an outlet named
mineCountLabel
- Connect up the flagButton as an outlet named
- Next add code to represent the outlets for each of the buttons to the the view controller, then connect them up by control (or right) click and dragging from the button to the code - the code to do that is shown below and can be copied and pasted:
@IBOutlet var mineSpace0_0: WKInterfaceButton! @IBOutlet var mineSpace0_1: WKInterfaceButton! @IBOutlet var mineSpace0_2: WKInterfaceButton! @IBOutlet var mineSpace0_3: WKInterfaceButton! @IBOutlet var mineSpace0_4: WKInterfaceButton! @IBOutlet var mineSpace1_0: WKInterfaceButton! @IBOutlet var mineSpace1_1: WKInterfaceButton! @IBOutlet var mineSpace1_2: WKInterfaceButton! @IBOutlet var mineSpace1_3: WKInterfaceButton! @IBOutlet var mineSpace1_4: WKInterfaceButton! @IBOutlet var mineSpace2_0: WKInterfaceButton! @IBOutlet var mineSpace2_1: WKInterfaceButton! @IBOutlet var mineSpace2_2: WKInterfaceButton! @IBOutlet var mineSpace2_3: WKInterfaceButton! @IBOutlet var mineSpace2_4: WKInterfaceButton! @IBOutlet var mineSpace3_0: WKInterfaceButton! @IBOutlet var mineSpace3_1: WKInterfaceButton! @IBOutlet var mineSpace3_2: WKInterfaceButton! @IBOutlet var mineSpace3_3: WKInterfaceButton! @IBOutlet var mineSpace3_4: WKInterfaceButton! @IBOutlet var mineSpace4_0: WKInterfaceButton! @IBOutlet var mineSpace4_1: WKInterfaceButton! @IBOutlet var mineSpace4_2: WKInterfaceButton! @IBOutlet var mineSpace4_3: WKInterfaceButton! @IBOutlet var mineSpace4_4: WKInterfaceButton! - Next connect actions as follows
- The reset button to an action named
resetPressed - The flag button to an action named
toggleFlaggingState
- The reset button to an action named
- We will also need to connect each of the buttons to an action, however the code in the action will rely on another method not yet written, so we will return to that later.
Interface controller code
In order to keep track of both the minesweeper 'model' and the userinterface components that provide a visual representation of the minefield, we need to create some variables.
- Add the following code to do just that:
private var flagging = false private var mineButtons : Array<Array<WKInterfaceButton>>() private var minefield : MineField! private var flaggedCells : Set<WKInterfaceButton>! private var clearedCells : Set<WKInterfaceButton>! - This should allow us to implement the bodies of the methods to toggle the flagging mode and reset the game. Implement the
toggleFlaggingStatemethod has shown here:@IBAction func toggleFlaggingState() { if minefield.hasStarted { flagging.toggle() flagButton.setBackgroundColor(flagging ? .red : .clear) } } - Implement the following method to configure the minefield and initialise the variables to keep track of the buttons
func setup(){ minefield = MineField(width: 5, height: 5) flaggedCells = Set() clearedCells = Set () } - Implement the
resetPressedmethod as follows:@IBAction func resetPressed() { if flagging {toggleFlaggingState()} setup() for row in mineButtons { for cell in row { cell.setTitle("") } } updateMineCountLabel() } - Next add the following methods, each of which should be fairly self explanatory:
func checkForCompletion(){ if clearedCells.count + min(flaggedCells.count,minefield.mineCount) == 25 { mineCountLabel.setText("👍") WKInterfaceDevice().play(.success) } } func showAllMines() { for minePoint in minefield.mineLocations() { mineButtons[minePoint.y][minePoint.x].setTitle("💣") mineCountLabel.setText("0 x") } } func deFlag(_ cell: WKInterfaceButton) { cell.setTitle("") flaggedCells.remove(at: flaggedCells.firstIndex(of: cell)!) updateMineCountLabel() } func flag(_ cell: WKInterfaceButton) { if !flaggedCells.contains(cell) { cell.setTitle("🇰🇵") flaggedCells.insert(cell) updateMineCountLabel() } } func updateMineCountLabel() { let minesLeft = minefield.mineCount - flaggedCells.count mineCountLabel.setText("\(minesLeft) x") } - Next add the following method to add each of the buttons to a two dimensional array so we can keep track of them more easily:
override func awake(withContext context: Any?) { setup() mineButtons = Array<Array<WKInterfaceButton>>() for _ in 0..<5 { mineButtons.append([WKInterfaceButton]()) } //add mines to array mineButtons[0].append(mineSpace0_0) mineButtons[0].append(mineSpace0_1) mineButtons[0].append(mineSpace0_2) mineButtons[0].append(mineSpace0_3) mineButtons[0].append(mineSpace0_4) mineButtons[1].append(mineSpace1_0) mineButtons[1].append(mineSpace1_1) mineButtons[1].append(mineSpace1_2) mineButtons[1].append(mineSpace1_3) mineButtons[1].append(mineSpace1_4) mineButtons[2].append(mineSpace2_0) mineButtons[2].append(mineSpace2_1) mineButtons[2].append(mineSpace2_2) mineButtons[2].append(mineSpace2_3) mineButtons[2].append(mineSpace2_4) mineButtons[3].append(mineSpace3_0) mineButtons[3].append(mineSpace3_1) mineButtons[3].append(mineSpace3_2) mineButtons[3].append(mineSpace3_3) mineButtons[3].append(mineSpace3_4) mineButtons[4].append(mineSpace4_0) mineButtons[4].append(mineSpace4_1) mineButtons[4].append(mineSpace4_2) mineButtons[4].append(mineSpace4_3) mineButtons[4].append(mineSpace4_4) } - Next add a method which will check a given point and update it appropriately - making use of the methods we wrote above:
func check(_ point: Point) { if minefield.isExploded { return } let cell = mineButtons[point.y][point.x] if !flag && flaggedCells.contains(cell) { deFlag(cell: cell) return } if flag && !clearedCells.contains(cell) { flag(cell: cell) checkForCompletion() return } let status = minefield.checkMine(point) if status.isMine { showAllMines() WKInterfaceDevice().play(.failure) return } cell.setTitle("\(status.adjacentMineCount)") clearedCells.insert(cell) checkForCompletion() } - The final stage is to create actions for each of the button, passing the relevant point to the checkPoint method, add the code and connect up the buttons as appropriate (this can be copy and pasted):
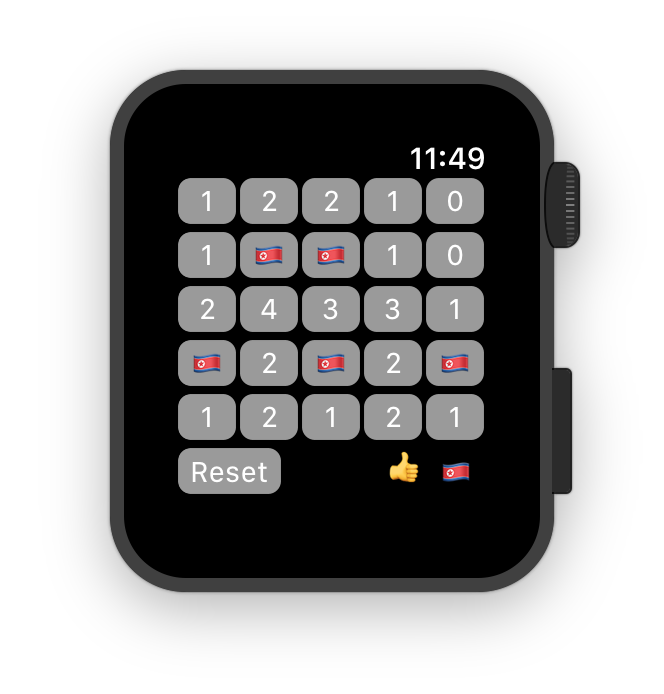
@IBAction func checkMine0_0() { check(point:Point(x: 0, y: 0)) } @IBAction func checkMine0_1() { check(point:Point(x: 1, y: 0)) } @IBAction func checkMine0_2() { check(point:Point(x: 2, y: 0)) } @IBAction func checkMine0_3() { check(point:Point(x: 3, y: 0)) } @IBAction func checkMine0_4() { check(point:Point(x: 4, y: 0)) } @IBAction func checkMine1_0() { check(point:Point(x: 0, y: 1)) } @IBAction func checkMine1_1() { check(point:Point(x: 1, y: 1)) } @IBAction func checkMine1_2() { check(point:Point(x: 2, y: 1)) } @IBAction func checkMine1_3() { check(point:Point(x: 3, y: 1)) } @IBAction func checkMine1_4() { check(point:Point(x: 4, y: 1)) } @IBAction func checkMine2_0() { check(point:Point(x: 0, y: 2)) } @IBAction func checkMine2_1() { check(point:Point(x: 1, y: 2)) } @IBAction func checkMine2_2() { check(point:Point(x: 2, y: 2)) } @IBAction func checkMine2_3() { check(point:Point(x: 3, y: 2)) } @IBAction func checkMine2_4() { check(point:Point(x: 4, y: 2)) } @IBAction func checkMine3_0() { check(point:Point(x: 0, y: 3)) } @IBAction func checkMine3_1() { check(point:Point(x: 1, y: 3)) } @IBAction func checkMine3_2() { check(point:Point(x: 2, y: 3)) } @IBAction func checkMine3_3() { check(point:Point(x: 3, y: 3)) } @IBAction func checkMine3_4() { check(point:Point(x: 4, y: 3)) } @IBAction func checkMine4_0() { check(point:Point(x: 0, y: 4)) } @IBAction func checkMine4_1() { check(point:Point(x: 1, y: 4)) } @IBAction func checkMine4_2() { check(point:Point(x: 2, y: 4)) } @IBAction func checkMine4_3() { check(point:Point(x: 3, y: 4)) } @IBAction func checkMine4_4() { check(point:Point(x: 4, y: 4)) } - In the scheme selector next to the run button, ensure the scheme is set to watchkit app, hit run and the game should launch in the watch simulator.
You can download a version of this project from GitHub
Task
Add a timer that counts up - ensure that it is frozen upon completion (including failure) of the game
Further Task
Create a new WatchKit app that allows the user to play Noughts and Crosses on the watch. Start by designing it for two human players, then improve by building an AI to play against a single player.