Persisting Data with NSCoding Project
This tutorial works through the process of creating a revision app with virtual cue cards. Data storage is implemented using adherence to the NSCoding protocol and uses NSKeyedArchiver and NSKeyedUnarchiver
The project
A starter application is available for cloning from GitHub, however if you wish to develop the whole project for yourself, then create an iOS application with a storyboard similar to that shown below:
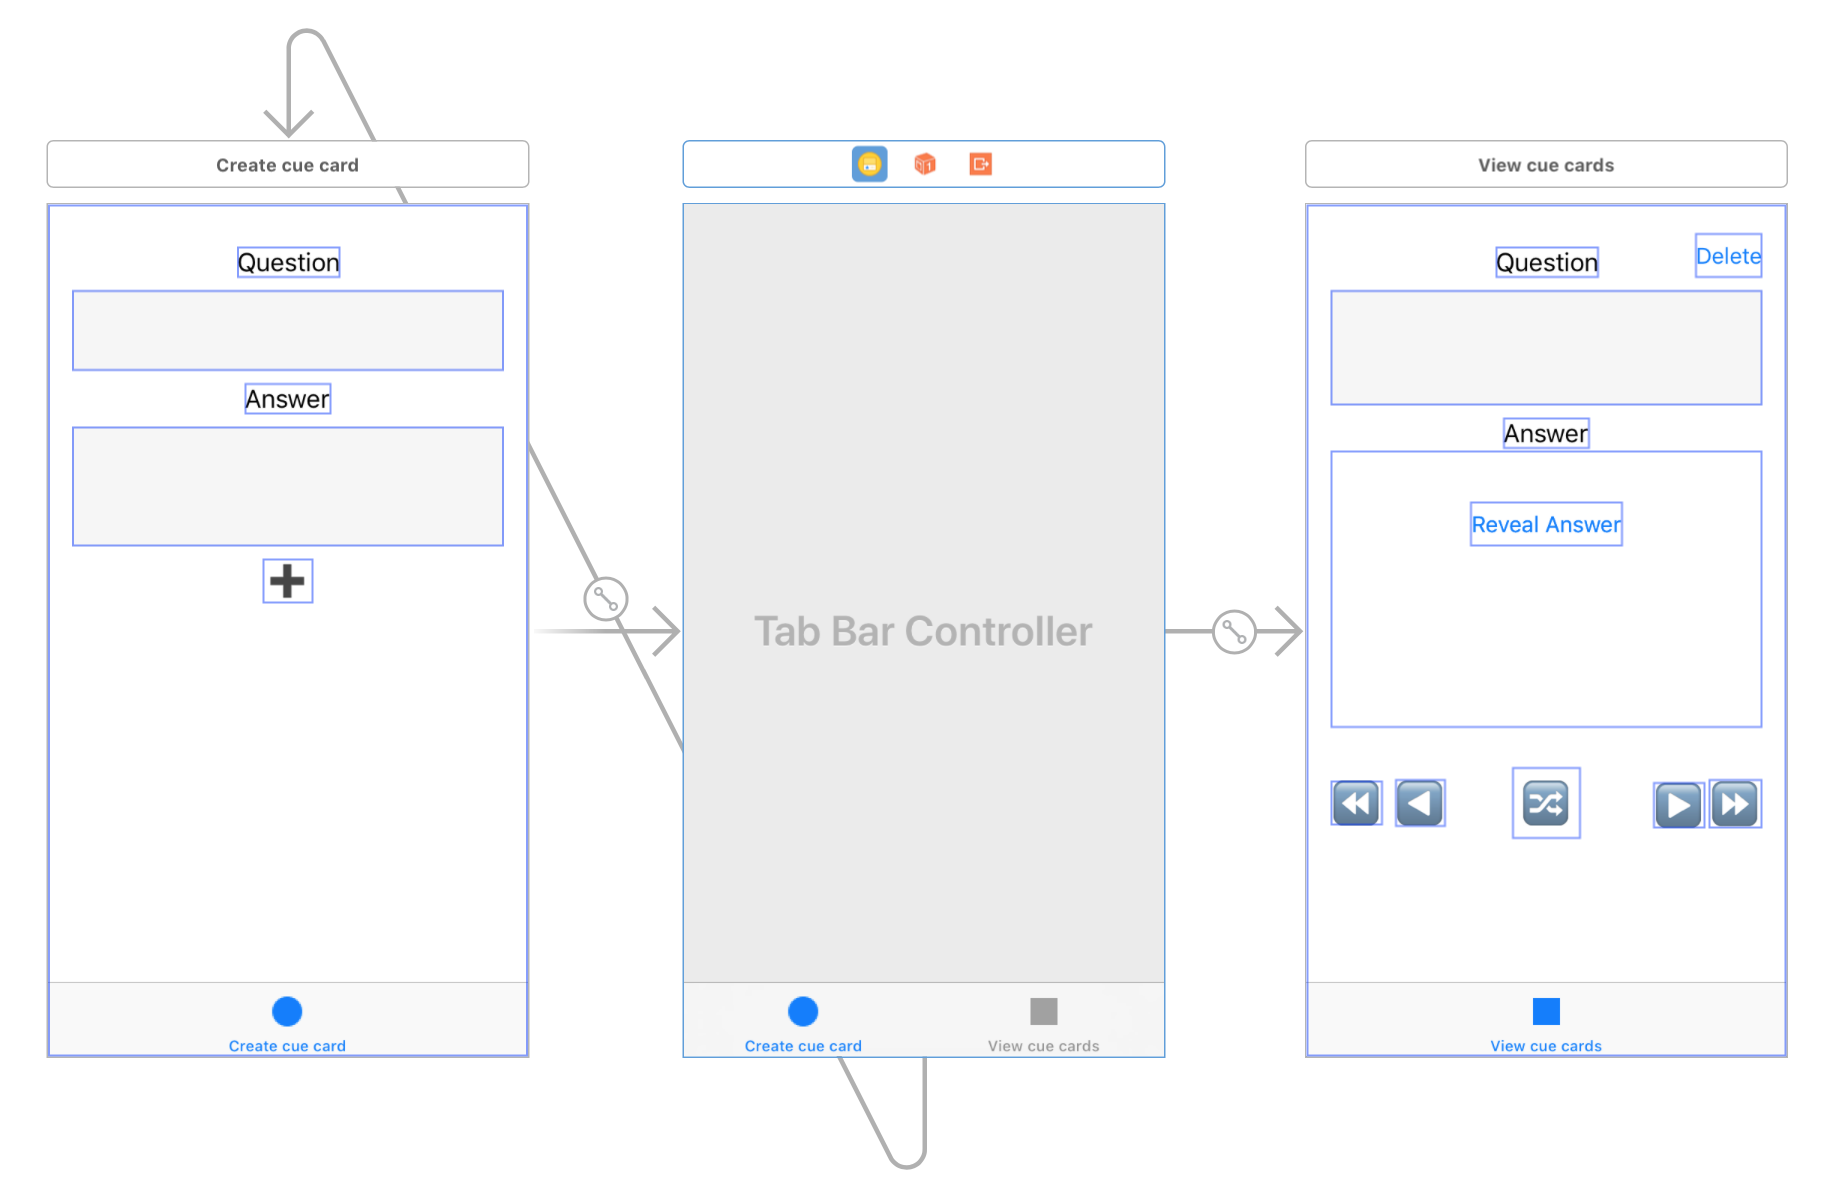 The outlet and action names in the below code should be semantic enough for you to identify which element on your own storyboard the below to. You will need to add the delete button if you use the project from GitHub.
The cue cards
- Start by creating a CueCard class as follows:
Note that it inherits from NSObject. This is required to enable archiving to disk later onclass CueCard : NSObject { init(question: String, answer: String){ self.question = question self.answer = answer } var question : String var answer: String } - The cue card class will also need to be able to be serialised, so modify the class declaration so it appears as follows:
Note that an error will appear warning that the CueCard class does not adhere to the NSCoding Protocol. Use the 'Fix' option to add method stubs to implement the required methods in NSCodingclass CueCard : NSObject, NSCoding { - Implement the bodies of these methods as follows, which will assigned a key for each property to be used when the data is serialised:
func encode(with aCoder: NSCoder) {
    aCoder.encode(question, forKey: "q")
    aCoder.encode(answer, forKey: "a")
}
required init?(coder aDecoder: NSCoder) {
    question = aDecoder.decodeObject(forKey: "q") as! String
    answer = aDecoder.decodeObject(forKey: "a") as! String
}
The Card Manager
iOS applications should adhere to the MVC design pattern, so the process of retrieving, adding, removing and storing tweets should not be handled by the View Controller. Instead the view controller should simply call appropriate methods within the card manager based on user interaction with the view, and update the view as a result of changes in the manager.
Implementing the Singleton Design Pattern
The Card manager will be used by both the create cue card and read cue card view controllers, but it should be the same manager and we only ever will want one of them within our app. This creates a good argument for making it a Singleton.
In Swift making a class a Singleton requires having a static public property that refers to the class, and making the init method private
- Create a CardManager class as follows:
class CardManager{ static let shared = CardManager() private init(){ } } - In order to refer to the cards and keep track of which one is in use, we will need to variables - an array of CueCard and a current index position integer. Add the following code for this
private var cards : [CueCard]! private var currentIndex = 0 - Next we will need logic for getting the current card and navigating through them. Add the following code (which can be copied and pasted) to do that:
var currentCard: CueCard? {
    return cardAtIndex(currentIndex)
}

func cardAtIndex(_ index: Int) -> CueCard?{
    guard cards != nil else {
        return nil
    }
    guard cards.count > index else {
        return nil
    }

    return cards[index]
}

func nextCard() -> CueCard? {
    guard cards != nil else {
        return nil
    }
    if  cards.count > currentIndex + 1 {
        currentIndex += 1
    }
    return currentCard
}

func previousCard() -> CueCard? {
    guard cards != nil else {
        return nil
    }
    if  currentIndex > 0 {
        currentIndex -= 1
    }
    return currentCard
}

func firstCard() -> CueCard? {
    currentIndex = 0
    return currentCard
}

func lastCard() -> CueCard? {
    guard cards != nil else {
        return nil
    }
    currentIndex = cards.count - 1
    return currentCard
}

func randomCard() -> CueCard? {
    guard cards != nil else {
        return nil
    }
    guard cards.count > 0  else{
        return nil
    }
    currentIndex = Int(arc4random_uniform(UInt32(cards.count)))
    return currentCard
}
Looking carefully at the above methods, you will see a number of statements with the keyword
guard.guardallows us to check that, for example, an optional is not nil, and if it is, exit. Once the guard statement is completed, optionals are treated as having values, which can simplify the logic. This is an example of 'Early Exit' programming, and is designed to avoid nesting conditional statements, which can be hard to read. - The CardManager class is somewhat useless if we cannot add cards to it (remember the Array of CueCards is private). We therefore need a method to add a card, so add the following code:
func addCard(_ card: CueCard){ cards.append(card) } - Similarly, we cannot remove cards, so add logic to do that as follows:
func removeCurrentCard(){
    guard cards != nil else {
        return
    }
    guard cards.count > currentIndex else {
        return
    }
    cards.remove(at: currentIndex)
    if currentIndex > 0 {
        currentIndex -= 1
    }
}
Linking it with the controllers
As the CardManager class is a singleton, we can create a reference to it in both the 'create card' and 'read cue cards' view controllers. This can be achieved with the following code:
let cardManager = CardManager.sharedAdd this code to both view controllers
- In the 'create card' view controller we need logic to create and add a new cue card. Firstly, add your own code to check to ensure that a user has populated both the question and answer TextViews then add the following code:
let card = CueCard(question: questionTextView.text, answer: answerTextView.text) cardManager.addCard(card) - Next add code to clear the text views contents and hide the keyboard
- Move to the 'read cue card' view controller, and add a method to display a cue card as follows:
func display(_ card: CueCard){ questionTextView.text = card.question answerTextView.text = card.answer } - Next hook up the first question button (⏪) action as follows:
@IBAction func firstQuestionPressed(_ sender: AnyObject) { if let card = cardManager.firstCard(){ display(card) } } - Repeat the above process for the previous, next, last and random question buttons
- Hook up the reveal action as follows:
@IBAction func revealAnswerPressed(_ sender: AnyObject) { answerTextView.alpha = 1 } - Add a method to hide the answer (which we will use when changing card)
- Add code to the
display(card:)method to call thehideAnswermethod When the view first loads, it needs to display the current card, or a message to tell the user to add some cards. Add the following methods to do that:
func displayCurrentCard(){ if let card = cardManager.currentCard { display(card) } else { questionTextView.text = "No questions added yet, why not create one?" } }- Add code to call the above methods from
viewDidLoad() - Add code to enable the current card to be deleted as follows:
func deleteCurrentCard(){ cardManager.removeCurrentCard() displayCurrentCard() } - Last but not least we want the user to be able to use that delete method, however we do not want this to happen by accident. Add the following to the action for the delete button (adding the action if required), which will prompt the user using a UIAlertController to confirm the deletion:
@IBAction func deletePressed(_ sender: Any) { let alert = UIAlertController(title: "Delete Card", message:"Are you sure you want to delete this card?", preferredStyle: .alert) alert.addAction(UIAlertAction(title: "Yes", style: .destructive, handler: { (action) in self.deleteCurrentCard() })) alert.addAction(UIAlertAction(title: "Cancel", style: .cancel, handler: nil)) present(alert, animated: true) } - Test the application and ensure that you can add, navigate through and remove cards. Don't add too many, as at this stage the data will not persist!
- Finally review the code, note how the controller only passes information between the view and the manager, it doesn't contain the application logic - so it adheres to the MVC design pattern.
Persisting data
-
To ensure our application remains useful after it is terminated, we need to persist the data to permanent storage. First add a computer property to the CardManager class which will return the location for the file as follows:
private var filePath: String { let docFolderUrl = FileManager.default.urls(for: .documentDirectory, in: .userDomainMask).last! return docFolderUrl.appendingPathComponent("cards.data").path } - Next add methods to save and load the file using NSKeyedArchiver and NSKeyedUnarchiver as follows:
private func load() { if let cards = NSKeyedUnarchiver.unarchiveObject(withFile: filePath) as? [CueCard] { self.cards = cards if !cards.isEmpty { currentIndex = 0 } } else { self.cards = [CueCard]() } } private func save() { NSKeyedArchiver.archiveRootObject(cards, toFile: filePath) } - Finally modify the init method, so that it calls the
load()method, and modify theAddCard()andremoveCurrentCard()methods so they call thesave()method before returning - Run the application. Terminate it, and relaunch it from the simulator (or device). Data should now persist between launches
Further work
NSCoding is just one way of persisting data. It could also be achieved by implementing the Codable protocol. Create a version of the project that persists data using Codable instead of NSCoding.