Level Selection
Setting up the interface
In order to handle level selection, we are going to make use of some of the UIKit features of iOS. At present the only element of UIKit we have been concerned with is the ViewController class that simply loads, configures and presents our SpriteKit Scene.
We are going to add a Navigation Controller and an associated UITableViewController to our project to display the available levels to the player.
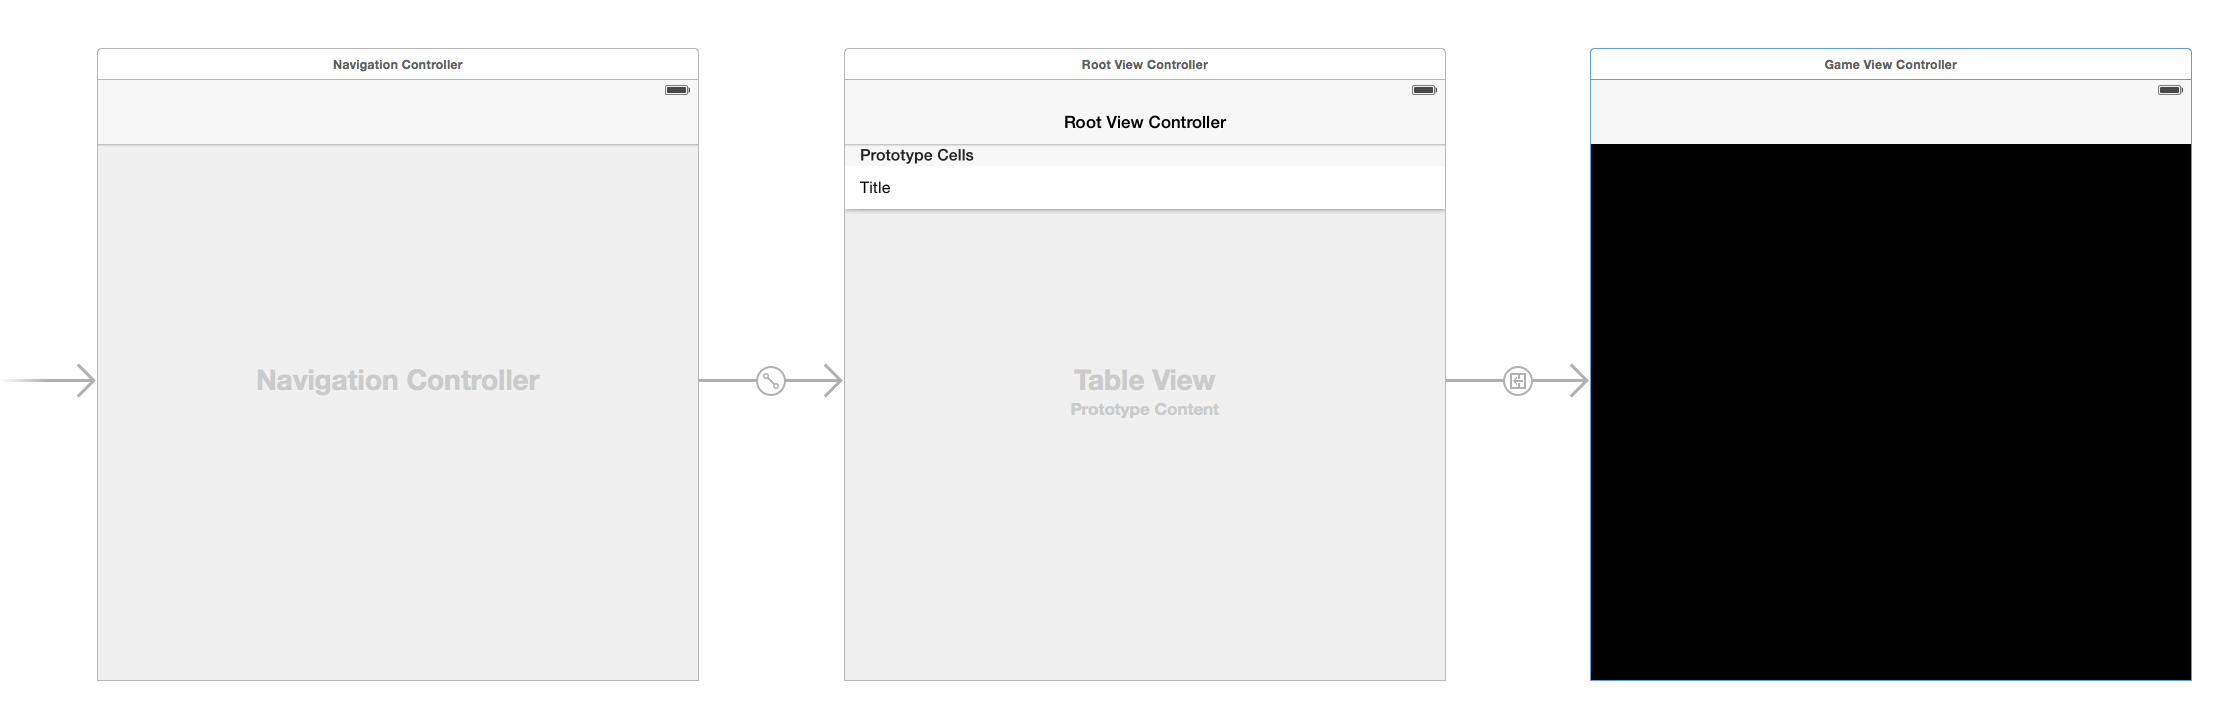
- Start by going to the Main.storyboard file, and from the objects browser (bottom right of Xcode) drag in a navigation controller, placing it to the left of the existing ViewController. Next drag the arrow that is pointing at the ViewController view and drag it so it points to the Navigation Controller.
- To zoom in and out of the storyboard, you can use the buttons towards the bottom of Xcode, or pinch the trackpad on a MacBook
- If necessary, zoom into the Table View. Select the only cell and in the properties for it, change the Style to 'Basic', and in the Identifier field type 'Cell'.
- Finally Ctrl (or right) click and drag from the cell to the ViewController view. When you release the mouse, choose the 'show' option under 'Selection Segue'. This will ensure that the selection of a cell in the table view (which will contain the list of levels) will load the ViewController which in turn will load the game scene.
- You should end up with a scene that appears as shown below:
- If you run the game you will be presented with an empty list. We now need to configure the Table View Controller to show a list of levels.
- Add a new Swift file to the project named LevelSelectViewController and create in that file a class with the same name, making it a subclass of UITableViewController. Also change the import statement to import UIKit as follows
import UIKit class LevelSelectViewController : UITableViewController { } - In the storyboard, select the centre Table View Controller (so it is surrounded by a blue glow) and in the identity inspector change the Class to LevelSelectViewController.
Configuring level selection
- In the LevelSelectViewController class, add the following code to create a variable to keep track of the highest level available to the player:
var maxLevel = 0 - Next override the viewDidLoad method and add code to retrieve the highest score from the standard user defaults (typing viewDidLoad in the IDE and pressing enter with it selected in the code completion box will add the boilerplate code):
override func viewDidLoad() { let defaults = UserDefaults.standard maxLevel = defaults.integer(forKey:"highScore") } - In order for the table view to show the correct number of cells with the correct information we need to configure them by implementing a number of methods for UITableViewController. First override the method that determines how many row there are in any given section of the table view:
This will ensure that there is always one level to selectoverride func tableView(_ tableView: UITableView, numberOfRowsInSection section: Int) -> Int { return maxLevel+1 } - Next implement the method that configures each cell, based on its row and section (indexPath):
override func tableView(_ tableView: UITableView, cellForRowAt indexPath: IndexPath) -> UITableViewCell { let cell = self.tableView.dequeueReusableCell(withIdentifier:"Cell") cell?.textLabel?.text = "Level \(indexPath.row+1)" return cell } - It should now be possible to navigate through the level selection to play the game, but there are some issues which need to be resolved
- Firstly we need to hide the navigation controller when playing the game, so it doesn't interfere with the game play. Inside the GameViewController.swift file, located the viewDidLoad method and add the following code after the first line:
navigationController?.setNavigationBarHidden(true, animated: true) - Later in the method, modify the code so that the node count and frames per second are not visible
Passing data between classes
The next stage is to enable data (i.e. the level) to be passed from the table view controller to the view controller to the scene,
- In the GameViewController class, add a property to store the level:
var level = 1 - Then in the LevelSelectViewController, override the
prepare(for segue: sender:)method and add code to set the level in the GameViewController:override func prepare(for segue: UIStoryboardSegue, sender: Any?) { let gameViewController = segue.destination as! GameViewController gameViewController.level = tableView.indexPathForSelectedRow!.row + 1 } - Similarly, in the viewDidLoad method of the GameViewController, add code to specify the starting level of the game scene (inside the
ifstatement) before the scene is presented:scene.level = level - Next, when the level is completed, we need the scene to be able to pass data back to the view controller, and from the view controller back to the table view controller. We will use the concept of delegation to do this.
- In GameScene.swift file, at the top and outside the
GameSceneclass add the following code:protocol PigeonSceneDelegate{ func level(_ level: Int, completed: Bool) } - Next inside the GameScene class add the following code:
var pigeonSceneDelegate: PigeonSceneDelegate? - Switch to the GameViewController.swift file and modify the class declaration to it adheres to the PigeonSceneDelegate as follows:
class GameViewController: UIViewController, PigeonSceneDelegate {} - Next implement the delegate method inside the GameViewController class as follows
This means that when a level is complete, but the player is not continuing (e.g. they lost) then view will be 'popped' and we will return to the list of levels.func level(_ level: Int, completed: Bool) { if !completed { navigationController?.popViewController(animated: true) } } - Finally, we need to tell the scene what will act as its delegate, so within the viewDidLoad method, after the scene is creation, but before it is presented (i.e. in the
ifstatement), add the following code:scene.pigeonSceneDelegate = self - So that the viewcontroller can pass data back to the level select controller, we need to implement similar functionality again. In the LevelSelectViewController.swift file (but outside of the class), implement a protocol as follows
protocol GameViewControllerDelegate{ func level(_ level: Int, completed: Bool) } - Next inside the GameViewController class add the following code:
var gameViewControllerDelegate: GameViewControllerDelegate? - Switch to the LevelSelectViewController, and in a similar manner to before, ensure that it implements the GameViewControllerDelegate protocol:
class LevelSelectViewController : UITableViewController, GameViewControllerDelegate {} - Then implement the GameViewControllerDelegate method, adding code inside the method to check and update the existing high score if required
func level(_ level: Int, completed: Bool) { if completed && level > maxLevel{ maxLevel = level - 1 let defaults = UserDefaults.standard defaults.set(level, forKey: "highScore") tableView.reloadData() } } - Then in the
prepareForSeguemethod add code to ensure the gameViewController can delegate to the level select view controller:gameViewController.gameViewControllerDelegate = self - Finally return to the
level(_ completed:)method in the GameViewController and add the following code outside theifstatement:gameViewControllerDelegate?.level(level, completed: completed) - The game should now play, the levels should increment, and you should be able to start at the highest level you have not yet completed. The only problem is that the game does not increase in difficulty. This could be resolved by changing the seedInterval value as the level goes up. An example (albeit not a very effective one) of how it could be done is shown below. Try and find a better solution:
seedInterval = 1.0 - Double(level)/100.0
A completed version of the game can be downloaded from GitHub