Uploading and linking an Image to a Database record
This page explains a simple way of linking uploaded files to a database entry, it assumes you already have a gridview linked to a database.
Creating links in the gridview
- Using the gridview's smart tag (small arrow at top right), choose the Edit Columns option.
- In the list of available fields, find the hyperlink field and add it to the selected fields. We will customise this link so that it redirects to another page for uploading an image, passing the ID of the selected item along with it, e.g. UploadImage.aspx?Id=4
- In the properties for the HyperLink, set the
Textfield toSet Image, then scroll down to the Data section and set theDataNavigateUrlFieldsto match the Id column name in your database (for exampleIdorProductId). In theDataNavigateUrlFormatfield, type the name of the page we will redirect the user to suffixed with ?Id={0}, e.g.UploadImage.aspx?Id={0}. This tells the GridView to take the Id field, and place it where the{0}syntax is. Your Fields dialogue should look similar to what is shown below: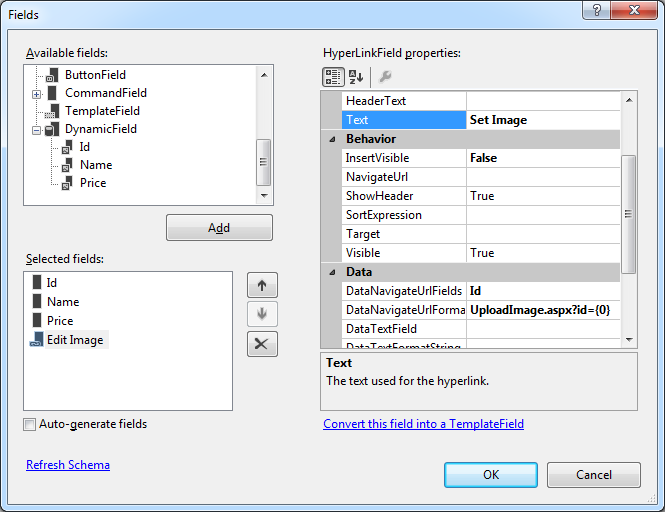
- Click OK, run the page, and you should see a link next to each item in your database, the page it links to should be the same, but the end should change based on the product.
Uploading an image and saving it with an Id
The next stage of the process involves us creating a page with a file upload control, a button, and some code that will save the file using the id from the query string.
-
If you have not already, create a page called UploadImage.aspx. Add a file upload control and a button to the page, name them appropriately. If you want to use the code example below exactly as it is written then the image upload control should be named
imageFileUploadControl. - Double click on the button to create a method, you will be taken to the .cs code page.
- In the body of the method for the button click add the following code:
//note much of the code to do this properly (i.e. check file type is correct) is missing //get the id from the query string (keeping it as a string is OK in this case) string productId = Request.QueryString["Id"]; string filename = productId + ".jpg"; string saveLoation = Server.MapPath("~/ProductImages/" + filename); imageFileUploadControl.SaveAS(saveLocation); - Finally create a folder in your website called ProductImages, and upload some image files (with the jpg extension)
- You should now be able to view your gridview, then browse to the upload page using the link in the gridview. When you upload an image, it will be saved using the id of the database record
Displaying the Image
- Add an asp Image tag to the UploadImage.aspx page and name it
CurrentImage - Place the code below inside the Page_Load method. This will display the existing uploaded image. Note that if you replace an image for a given Id, you will need to fully refresh the page, as the browser will cache the old image.
//create filename using query string
string productId = Request.QueryString["Id"];
string filename = productId + ".jpg";

//note that this is missing alternate text and dimensions
CurrentImage.ImageUrl = "~/ProductImages/" + filename;